The Easy Coconut Dessert You’ll Want to Make Again and Again
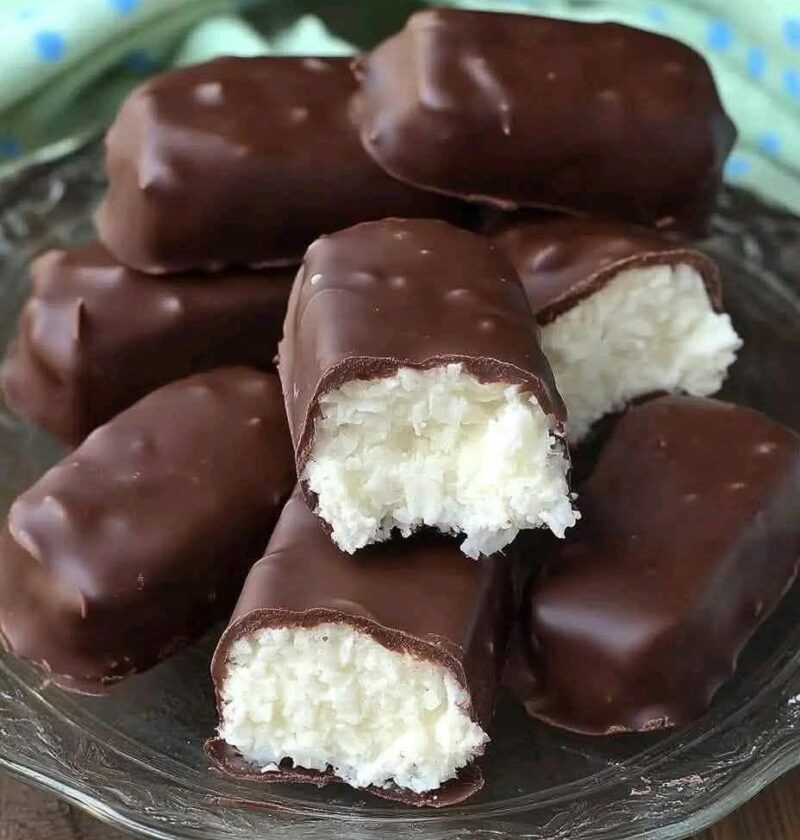
If you’re searching for a quick no-bake dessert that combines the natural sweetness of coconut with the richness of dark chocolate, these No-Bake Coconut Chocolate Bliss Bars are about to become your new favorite homemade treat. With simple pantry ingredients and minimal preparation time, this recipe delivers a delicious balance of creamy texture, chocolate flavor, and tropical coconut goodness.
Unlike many traditional desserts that require baking, complicated techniques, or long ingredient lists, these homemade coconut chocolate bars are wonderfully simple. All you need is a blender, a handful of wholesome ingredients, and a little chilling time. The result is a satisfying snack or dessert that looks impressive but requires very little effort.
These bars are perfect for busy weekdays, healthy snacking, family gatherings, holiday dessert trays, lunchbox treats, or whenever a chocolate craving strikes. Their soft coconut center and crisp chocolate coating create an irresistible combination that appeals to both children and adults.
Whether you’re a fan of coconut desserts, dark chocolate treats, or easy no-bake recipes, this simple creation deserves a permanent place in your recipe collection.
Why These Coconut Chocolate Bars Are So Popular
There are countless dessert recipes available online, but this one stands out for several reasons.
No Oven Required
One of the biggest advantages is that these bars require absolutely no baking. This makes them ideal during warmer months when turning on the oven isn’t appealing.
Made with Simple Ingredients
Most ingredients are pantry staples that many home cooks already have on hand.
Naturally Sweetened Option
Using honey or maple syrup provides natural sweetness while complementing the flavor of coconut.
Rich Chocolate Coating
Dark chocolate adds a luxurious finish and balances the sweetness of the filling.
Perfect for Meal Prep
These bars can be prepared ahead of time and stored in the refrigerator or freezer for convenient snacking throughout the week.
Family-Friendly Dessert
Their candy-bar appearance makes them appealing to children, while the wholesome ingredients make them a favorite among adults.
What Makes Coconut and Chocolate Such a Perfect Pair?
The combination of coconut and chocolate has remained popular for generations because the two flavors complement each other beautifully.
Coconut offers:
- Natural sweetness
- Soft texture
- Tropical flavor
- Rich aroma
Dark chocolate contributes:
- Deep cocoa notes
- Slight bitterness
- Smooth texture
- Luxurious finish
Together, they create a balanced dessert that feels indulgent without requiring complicated preparation.
The contrast between the creamy coconut center and the chocolate shell is what makes these bars so satisfying.
Understanding the Key Ingredients
Every ingredient contributes something important to the final texture and flavor.
Shredded Coconut
Shredded coconut serves as the heart of the recipe.
Benefits include:
- Natural texture
- Mild sweetness
- Tropical flavor
- Fiber content
- Pleasant chewiness
Unsweetened shredded coconut works especially well because it allows better control over sweetness.
Honey or Maple Syrup
These natural sweeteners help bind the ingredients together while adding flavor.
Honey provides:
- Floral sweetness
- Smooth consistency
- Natural richness
Maple syrup contributes:
- Deep caramel notes
- Subtle earthy flavor
- Excellent moisture
Both options work beautifully in this recipe.
Coconut Oil
Coconut oil plays multiple roles.
It helps:
- Bind the mixture
- Improve texture
- Enhance coconut flavor
- Create a smooth consistency
Its mild tropical aroma pairs perfectly with the shredded coconut.
Vanilla Extract
Although used in a small quantity, vanilla adds warmth and depth to the flavor profile.
Many professional bakers consider vanilla essential for enhancing sweet recipes.
Salt
A tiny pinch of salt may seem insignificant, but it performs an important function.
Salt helps:
- Balance sweetness
- Intensify chocolate flavor
- Enhance overall taste
Dark Chocolate
The chocolate coating transforms a simple coconut mixture into an elegant dessert.
Dark chocolate offers:
- Rich cocoa flavor
- Smooth texture
- Beautiful appearance
- Balanced sweetness
It also creates the satisfying snap that contrasts with the soft filling.
Why No-Bake Desserts Continue to Trend
No-bake recipes remain among the most searched dessert categories online.
Convenience
Most people appreciate recipes that fit into busy schedules.
Fewer Kitchen Tools
No baking means fewer dishes and less cleanup.
Consistent Results
Without worrying about oven temperatures, recipes tend to be more forgiving.
Perfect for Beginners
No-bake desserts are excellent for people new to cooking.
Great for Warm Weather
They help keep kitchens cool during summer months.
These advantages explain why no-bake chocolate desserts continue to grow in popularity.
The Secret to Perfect Coconut Bars Every Time
While this recipe is straightforward, a few simple techniques can improve your results.
Blend Until Smoothly Combined
The mixture should become sticky enough to hold its shape.
If needed, a little extra coconut oil or sweetener can help achieve the proper consistency.
Shape Uniformly
Creating evenly sized bars ensures consistent chilling and a professional appearance.
Freeze Before Dipping
Firm bars are much easier to coat in melted chocolate.
Skipping this step can make the coating process messy.
Use High-Quality Chocolate
Better chocolate typically melts more smoothly and creates a more attractive finish.
Allow Proper Setting Time
Giving the chocolate enough time to harden helps maintain clean edges and an appealing appearance.
Perfect Occasions for Serving These Bars
These versatile treats fit nearly every occasion.
Healthy Dessert Option
When compared to many traditional desserts, these bars offer a simpler ingredient list.
Holiday Cookie Trays
Their glossy chocolate coating makes them look festive and elegant.
Homemade Gifts
Packaged in decorative boxes, they make thoughtful edible gifts.
Afternoon Snacks
They’re perfect alongside coffee or tea.
Party Desserts
Their bite-sized shape makes serving easy.
Lunchbox Treats
Stored properly, they make convenient grab-and-go snacks.
Creative Variations to Try
Although the original recipe is delicious, there are several ways to personalize it.
Extra Coconut Version
Roll the chocolate-coated bars in additional shredded coconut before the chocolate fully sets.
Almond Coconut Bars
Add finely chopped almonds to the filling for extra crunch.
Chocolate Drizzle Finish
Drizzle melted white chocolate over the bars for a decorative touch.
Espresso Chocolate Coconut Bars
Add a small amount of instant espresso powder to the chocolate coating.
Sea Salt Chocolate Bars
Sprinkle flaky sea salt over the chocolate coating before it hardens.
Tropical Coconut Delight
Add a small amount of finely chopped dried pineapple to the filling for a tropical twist.
Storage Tips
These bars store exceptionally well.
Refrigerator Storage
Place in an airtight container and refrigerate for up to one week.
Freezer Storage
Freeze individually for convenient portions.
Allow a few minutes at room temperature before serving.
Make-Ahead Friendly
Prepare several days before parties or gatherings for stress-free entertaining.
Common Mistakes to Avoid
Mixture Too Dry
If the coconut mixture won’t hold together, add a little more coconut oil or honey.
Overheating Chocolate
Chocolate should be melted gently to maintain a smooth texture.
Skipping Chilling Time
Cold bars are much easier to coat and handle.
Uneven Coating
Allow excess chocolate to drip off before placing bars back onto parchment paper.
Serving Suggestions
These coconut chocolate bars pair beautifully with:
- Coffee
- Cappuccino
- Tea
- Hot chocolate
- Fresh berries
- Vanilla yogurt
- Fruit platters
- Dessert boards
For an elegant presentation, arrange them on a serving tray and garnish with coconut flakes or chocolate curls.
Frequently Asked Questions
Can I use maple syrup instead of honey?
Yes. Both sweeteners work equally well and provide excellent flavor.
Can I use milk chocolate?
Yes, although dark chocolate provides a richer contrast to the sweet coconut filling.
Are these bars freezer-friendly?
Absolutely. They freeze well and can be stored for several weeks.
Can I make them into bite-sized balls?
Yes. The mixture can easily be rolled into small truffles instead of bars.
Do I need special equipment?
No. A blender and a bowl for melting chocolate are all that’s required.
Final Thoughts
These No-Bake Coconut Chocolate Bliss Bars prove that delicious homemade desserts don’t need to be complicated. With wholesome ingredients, rich chocolate flavor, and a soft coconut center, they offer the perfect combination of taste and texture.
Easy to prepare, endlessly customizable, and ideal for both everyday snacking and special occasions, these bars are a wonderful addition to any dessert collection. Once you’ve made them once, you’ll understand why they quickly become a household favorite.
Part 2: Simple Recipe Card
No-Bake Coconut Chocolate Bliss Bars
Ingredients
For the Coconut Filling
- 1 cup shredded coconut
- ¼ cup honey or maple syrup
- ¼ cup coconut oil
- ¼ teaspoon vanilla extract
- Pinch of salt
For the Chocolate Coating
- 100g dark chocolate
Instructions
Step 1: Blend the Filling
- Add shredded coconut, honey (or maple syrup), coconut oil, vanilla extract, and salt to a blender.
- Blend until a sticky, dough-like mixture forms.
- If needed, add a little extra coconut oil or honey for easier blending.
Step 2: Shape the Bars
- Scoop portions of the mixture and shape into small bars or balls.
- Place on a parchment-lined tray.
Step 3: Freeze
- Transfer to the freezer for at least 30 minutes or until firm.
Step 4: Melt the Chocolate
- Melt the dark chocolate using a microwave in short intervals or over a bowl of simmering water.
- Stir until smooth and glossy.
Step 5: Coat the Bars
- Dip each frozen coconut bar into the melted chocolate.
- Ensure all sides are covered.
- Return to the parchment-lined tray.
Step 6: Set the Chocolate
- Place in the refrigerator or freezer for 15–20 minutes until the coating hardens.
Step 7: Serve
- Enjoy immediately or store chilled for later.
Recipe Information
- Prep Time: 15 minutes
- Freeze Time: 30 minutes
- Chocolate Setting Time: 15–20 minutes
- Total Time: Approximately 1 hour
- Yield: 8–12 bars
- Difficulty Level: Easy
- Method: No-Bake