The Easy Homemade Dessert That Tastes Like a Premium Candy Bar
If you’re searching for a quick no-bake dessert recipe that delivers layers of chocolate flavor, caramel-like sweetness, and irresistible crunch, these Ultimate Caramel Chocolate Crunch Bars deserve a place at the top of your must-make list.
Every bite combines creamy chocolate, buttery richness, and a satisfying crispy texture that rivals expensive gourmet candy bars. The best part? You don’t need special baking skills, complicated ingredients, or hours in the kitchen. This simple dessert comes together using everyday pantry staples and requires no oven at all.
Perfect for holidays, family gatherings, bake sales, gift boxes, party platters, or satisfying a chocolate craving, these bars offer the ideal balance of smooth, crunchy, chewy, and sweet. Their layered texture creates a dessert experience that feels luxurious while remaining surprisingly easy to prepare.
Whether you’re a beginner cook or an experienced dessert enthusiast, this recipe delivers impressive results with very little effort.
Why These Chocolate Crunch Bars Are So Popular
Some desserts become instant favorites because they offer everything people love in one bite. These bars do exactly that.
No Baking Required
One major advantage is convenience. Unlike traditional dessert bars that require baking, cooling, and careful timing, these bars rely on simple melting and chilling methods.
Minimal Ingredients
With only a handful of ingredients, this recipe keeps shopping simple while still producing incredible flavor.
Rich Chocolate Flavor
Chocolate lovers appreciate the deep cocoa notes found in both the base and topping layers.
Satisfying Crunch
The addition of crispy rice cereal or toasted nuts introduces a delightful crunch that complements the creamy chocolate perfectly.
Great for Any Occasion
These bars fit equally well at birthday parties, holiday celebrations, casual gatherings, or as homemade gifts.
What Makes These Bars So Irresistible?
The secret lies in the combination of contrasting textures.
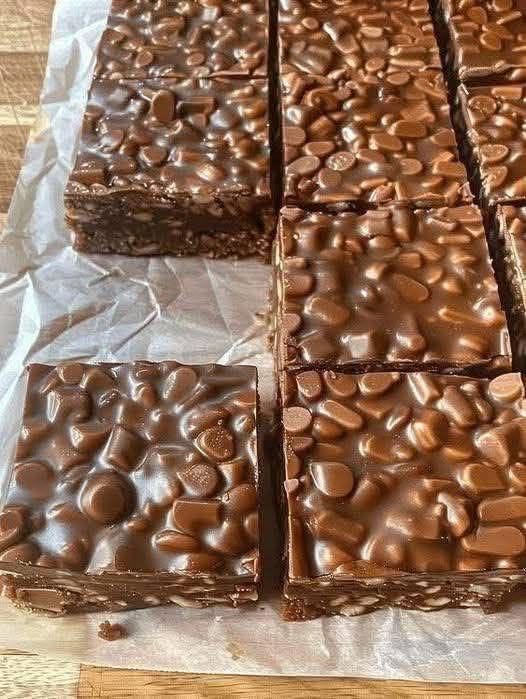
The base layer is smooth, rich, and slightly chewy thanks to the sweetened condensed milk and melted chocolate. Once mixed with crispy cereal or toasted nuts, it develops a satisfying crunch that makes every bite interesting.
The chocolate topping creates a glossy finish that firms up beautifully after chilling. As you bite into the bars, the top layer gently cracks before giving way to the creamy center beneath.
This contrast between crunchy and creamy is what keeps people reaching for another square.
Understanding the Key Ingredients
Each ingredient serves an important purpose in creating the perfect texture and flavor.
Sweetened Condensed Milk
Sweetened condensed milk acts as the foundation of the recipe.
It contributes:
- Creaminess
- Sweetness
- Structure
- Smooth texture
- Rich flavor
Its thick consistency helps bind the ingredients together without requiring baking.
Semi-Sweet Chocolate Chips
Semi-sweet chocolate offers the perfect balance between sweetness and cocoa richness.
Benefits include:
- Deep chocolate flavor
- Smooth melting ability
- Silky consistency
- Balanced sweetness
Unsalted Butter
Butter adds luxurious richness while helping create a smooth, melt-in-your-mouth texture.
Using unsalted butter allows the sweetness and chocolate flavors to remain the stars of the dessert.
Crispy Rice Cereal
Rice cereal introduces a light, airy crunch that transforms the texture.
This ingredient helps make the bars lighter while providing an enjoyable crispness throughout every bite.
Toasted Nuts
For those who enjoy a nutty flavor, toasted pecans or almonds add incredible depth and crunch.
Toasting enhances their natural oils and creates a richer flavor profile.
Chocolate Topping
The final chocolate layer adds visual appeal while delivering an extra dose of chocolate goodness.
Coconut Oil or Butter
A small amount helps the chocolate melt smoothly and creates a glossy finish after setting.
Flaky Sea Salt
Although optional, flaky sea salt enhances sweetness and balances the chocolate beautifully.
Many gourmet dessert makers use sea salt to intensify chocolate flavors.
Why No-Bake Desserts Continue to Trend
No-bake desserts have become increasingly popular among home cooks for several reasons.
Time-Saving Convenience
Busy schedules leave little room for lengthy baking projects. No-bake recipes offer impressive results with minimal effort.
Perfect for Warm Weather
During summer months, many people prefer avoiding a hot oven. Chilled desserts provide a refreshing alternative.
Beginner-Friendly Techniques
Most no-bake recipes involve straightforward methods that don’t require advanced skills.
Reliable Results
Without worrying about oven temperatures or baking times, it’s easier to achieve consistent success.
These benefits make no-bake desserts some of the most searched recipes online.
How to Achieve the Perfect Texture
Texture is one of the most important elements of this recipe.
Use Fresh Crispy Cereal
Fresh cereal maintains its crunch and prevents the bars from becoming soft.
Toast Nuts Before Using
Toasting pecans or almonds enhances both flavor and texture.
A few minutes in a dry skillet can dramatically improve the final result.
Mix Thoroughly
Ensure all cereal or nuts are evenly coated with the chocolate mixture.
This creates consistent flavor and structure throughout the bars.
Press Firmly Into the Pan
Compact bars hold together better when sliced.
Using the back of a measuring cup helps create a smooth, even layer.
Chill Completely
Adequate chilling time allows the bars to firm up properly.
Patience rewards you with cleaner slices and better texture.
Best Occasions for Serving These Bars
These versatile treats fit almost any event.
Holiday Dessert Trays
Their attractive layers make them a beautiful addition to festive dessert tables.
Bake Sales
Because they’re easy to portion and transport, they’re ideal for fundraising events.
Birthday Celebrations
Chocolate lovers of all ages enjoy these rich and crunchy treats.
Potluck Gatherings
Since they don’t require reheating, they’re easy to bring to parties.
Homemade Gift Boxes
Packaged in decorative containers, these bars make thoughtful edible gifts.
Family Movie Nights
Serve alongside popcorn and cold milk for a memorable snack experience.
Creative Flavor Variations
While the classic version is delicious, there are countless ways to personalize the recipe.
Salted Caramel Style
Adding caramel sauce creates extra sweetness and a richer caramel flavor.
Espresso Chocolate Crunch
A small amount of instant espresso powder enhances the chocolate without creating a strong coffee taste.
Peanut Butter Chocolate Bars
Swirling peanut butter into the mixture adds creamy nuttiness.
White Chocolate Version
White chocolate creates a sweeter, creamier variation.
Holiday Peppermint Crunch
Crushed peppermint candies add festive flavor and color.
Triple Chocolate Delight
Combine dark, milk, and semi-sweet chocolate for maximum richness.
Storage and Make-Ahead Tips
One of the best features of this recipe is its excellent storage capability.
Refrigerator Storage
Store bars in an airtight container for up to two weeks.
Separate layers with parchment paper to prevent sticking.
Freezer Storage
Freeze bars individually for convenient future treats.
Allow them to thaw slightly before serving.
Preparing Ahead for Events
These bars can be made several days in advance, making party preparation much easier.
Common Mistakes to Avoid
Overheating Chocolate
Excessive heat can cause chocolate to become grainy or seize.
Always melt gradually and stir frequently.
Skipping Parchment Paper
Parchment paper makes removal effortless and ensures neat slices.
Under-Chilling
Bars that haven’t fully set may crumble during cutting.
Uneven Pressing
A level base creates professional-looking results.
Serving Suggestions for an Elegant Presentation
Presentation can elevate a simple dessert into something memorable.
Serve these bars with:
- Fresh strawberries
- Coffee
- Cappuccino
- Espresso
- Hot chocolate
- Vanilla ice cream
- Whipped cream
- Dessert charcuterie boards
For parties, cut them into bite-sized squares and arrange them on decorative serving platters.
Frequently Asked Questions
Can I use only nuts instead of cereal?
Yes. Pecans, almonds, walnuts, or mixed nuts work beautifully.
Can I use dark chocolate?
Absolutely. Dark chocolate creates a richer and less sweet flavor profile.
How long do these bars stay fresh?
When refrigerated properly, they can remain fresh for up to two weeks.
Can I double the recipe?
Yes. Simply use a larger baking dish and double all ingredients.
Do these bars need baking?
No. The entire recipe is completely no-bake.
Final Thoughts
These Ultimate No-Bake Caramel Chocolate Crunch Bars deliver everything dessert lovers crave: rich chocolate flavor, buttery sweetness, satisfying crunch, and effortless preparation. Their combination of textures and flavors creates a homemade treat that feels every bit as indulgent as premium candy bars sold in specialty shops.
Because they’re easy to prepare, highly customizable, and perfect for sharing, they’re a wonderful addition to your dessert collection. Whether you’re preparing treats for the holidays, creating edible gifts, or simply satisfying a sweet tooth, these chocolate crunch bars are guaranteed to impress every time.
Part 2: Simple Recipe Card
No-Bake Caramel Chocolate Crunch Bars
Ingredients
For the Crunch Base
- 1 can (14 oz) sweetened condensed milk
- 1½ cups semi-sweet chocolate chips
- ½ cup (1 stick) unsalted butter
- 2½ cups crispy rice cereal or toasted pecans/almonds
For the Chocolate Layer
- 1 cup semi-sweet or dark chocolate chips
- 1 tablespoon coconut oil or butter
- Flaky sea salt (optional)
Instructions
Step 1: Prepare the Base
- In a microwave-safe bowl, combine sweetened condensed milk, 1½ cups chocolate chips, and butter.
- Microwave in 30-second intervals, stirring after each interval until completely melted and smooth.
Step 2: Add the Crunch
- Stir in crispy rice cereal or toasted nuts until evenly coated.
Step 3: Transfer to Pan
- Line an 8×8-inch pan with parchment paper.
- Press the mixture firmly and evenly into the prepared pan.
Step 4: Make the Chocolate Topping
- In a separate bowl, melt 1 cup chocolate chips with coconut oil or butter until smooth.
- Pour over the base and spread evenly.
Step 5: Finish and Chill
- Sprinkle with flaky sea salt if desired.
- Refrigerate for 1–2 hours until firm.
Step 6: Slice and Serve
- Remove from the pan using the parchment paper overhang.
- Cut into 16 squares and serve.
Recipe Details
- Prep Time: 20 minutes
- Chill Time: 1–2 hours
- Total Time: About 2 hours 20 minutes
- Yield: 16 bars
- Difficulty: Easy
- Method: No-Bake