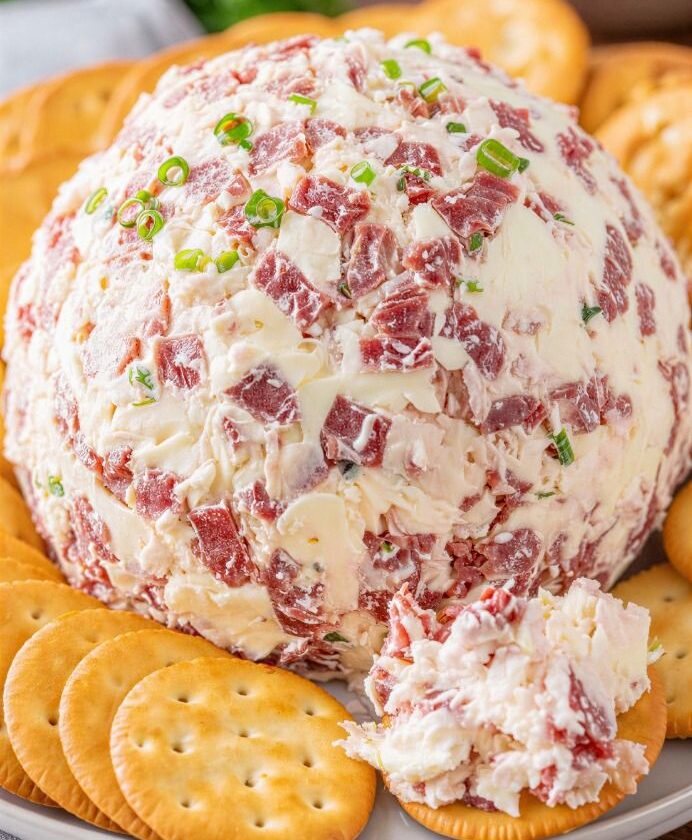
When it comes to easy party appetizers that deliver maximum flavor with minimal effort, few recipes can compete with a classic cheese ball. Among all the variations out there, this Creamy Dried Beef Cheese Ball stands out as a nostalgic favorite that continues to win hearts across generations. It’s rich, savory, slightly tangy, and incredibly satisfying—everything you want in a crowd-pleasing snack.
This recipe is inspired by traditional “chipped beef” spreads that were popular in mid-century home kitchens. Over time, it evolved into a more refined and convenient appetizer, shaped into a ball, coated with flavorful toppings, and served with crackers or bread. Today, it remains a staple at holiday tables, potlucks, and game-day gatherings.
Why This Cheese Ball Recipe Is So Popular
There’s a reason this appetizer has stood the test of time. It checks all the right boxes:
- Quick and easy to prepare
- Uses simple, affordable ingredients
- Perfect for make-ahead entertaining
- Loved by both kids and adults
- Highly customizable
In today’s world of complicated recipes and trendy ingredients, this dish brings you back to basics. It proves that you don’t need fancy components to create something memorable.
The Flavor Profile: Rich, Savory, and Perfectly Balanced
What makes this cheese ball truly irresistible is its well-balanced flavor. Each ingredient plays an important role:
- Cream cheese provides a smooth, rich, and slightly tangy base
- Dried beef adds a salty, umami-packed punch
- Worcestershire sauce enhances depth with a subtle tangy complexity
- Garlic powder introduces a mild, aromatic warmth
- Black pepper adds just a hint of spice
- Milk or sour cream improves texture, making it extra creamy
When combined, these ingredients create a spread that’s bold but not overwhelming. The flavors complement each other beautifully, making it hard to stop at just one bite.
A Nostalgic Classic with Modern Appeal
This recipe has roots in traditional American home cooking, where convenience foods like dried beef became pantry staples. Back then, recipes were designed to be practical, budget-friendly, and suitable for feeding families or entertaining guests.
Today, while food trends constantly evolve, there’s still something incredibly comforting about these classic recipes. They remind people of family gatherings, festive celebrations, and simple moments shared around the table.
What’s interesting is how well this recipe adapts to modern tastes. You can keep it traditional or give it a fresh twist with different coatings or serving styles.
Perfect for Every Occasion
One of the biggest advantages of this cheese ball is its versatility. It fits seamlessly into almost any occasion:
Holiday Parties
Whether it’s Eid gatherings, New Year celebrations, or family dinners, this appetizer adds a festive touch to the table.
Game Day Snacks
It pairs perfectly with chips, crackers, and finger foods, making it ideal for watching sports with friends.
Casual Get-Togethers
You don’t need a special occasion to enjoy this recipe. It’s simple enough for everyday snacking.
Potlucks and Buffets
Since it’s easy to transport and doesn’t require reheating, it’s a great choice for shared meals.
Texture: Smooth Inside, Flavorful Outside
A great cheese ball isn’t just about flavor—it’s also about texture. This recipe delivers a perfect contrast:
- The inside is soft, creamy, and spreadable
- The outside can be coated with crunchy or fresh ingredients
Optional coatings like chopped nuts, parsley, or extra dried beef add visual appeal and an extra layer of texture. This combination makes the appetizer more interesting and enjoyable.
The Secret to the Perfect Cheese Ball
While the recipe itself is simple, a few small techniques can elevate the final result:
Use Softened Cream Cheese
This is essential for achieving a smooth and lump-free mixture. Cold cream cheese can make mixing difficult and affect the texture.
Finely Chop the Dried Beef
Smaller pieces ensure even distribution of flavor throughout the cheese ball.
Balance the Moisture
Adding milk or sour cream helps create a creamy consistency without making the mixture too loose.
Chill Before Serving
Refrigerating the cheese ball allows it to firm up, making it easier to shape and enhancing the flavor.
Customization Ideas to Make It Your Own
Although the original recipe is delicious on its own, you can easily customize it to suit your preferences:
Flavor Enhancements
- Add finely chopped green onions for freshness
- Mix in a bit of shredded cheddar for extra richness
- Include a pinch of paprika for subtle smokiness
Coating Variations
- Chopped nuts for crunch
- Fresh herbs like parsley for color
- Crushed crackers for a unique texture
Serving Options
- Classic crackers
- Toasted bread slices
- Vegetable sticks like carrots and cucumbers
These variations allow you to personalize the recipe while keeping its core identity intact.
Make-Ahead Convenience
One of the best features of this cheese ball is that it can be prepared in advance. In fact, it tastes even better after a few hours in the refrigerator, as the flavors have time to meld together.
You can:
- Prepare it a day ahead
- Store it in an airtight container
- Add the coating just before serving for freshness
This makes it a stress-free option for entertaining.
Storage and Shelf Life
Proper storage ensures that your cheese ball stays fresh and delicious:
- Keep it refrigerated when not serving
- Cover tightly with plastic wrap or store in an airtight container
- Consume within 3–4 days for best quality
Avoid leaving it at room temperature for extended periods, especially in warm climates.
Why This Recipe Works for Beginners
If you’re new to cooking, this is an excellent recipe to start with. It doesn’t require:
- Advanced cooking skills
- Special equipment
- Complicated techniques
All you need is a mixing bowl, a spoon, and a little time. The process is straightforward, and the results are consistently good.
A Budget-Friendly Appetizer
Another reason this recipe remains popular is its affordability. The ingredients are simple and widely available, making it an economical choice for feeding a crowd.
Despite its low cost, it delivers a rich and satisfying taste that feels indulgent.
Presentation Tips for a Professional Look
Even though this is a simple dish, presentation can make it stand out:
- Shape it into a neat, round ball
- Roll it evenly in your chosen coating
- Place it on a decorative plate
- Surround it with crackers or vegetables
These small touches can make your appetizer look impressive without extra effort.
Common Mistakes to Avoid
To ensure the best results, keep these points in mind:
- Don’t use cold cream cheese
- Avoid adding too much liquid
- Make sure the dried beef is finely chopped
- Chill the mixture before shaping
These simple precautions can make a big difference.
Why You’ll Keep Coming Back to This Recipe
Once you try this Creamed Dried Beef Cheese Ball, it’s likely to become a regular part of your recipe collection. It’s reliable, delicious, and incredibly easy to prepare.
In a world full of complicated dishes, this recipe stands out for its simplicity and effectiveness. It brings people together, sparks conversation, and adds a comforting touch to any gathering.
Part 2: Simple Step-by-Step Recipe
Ingredients
- 2 packages (8 oz each) cream cheese, softened
- 1 jar (2.5 oz) dried beef, finely chopped
- 2 tablespoons milk or sour cream (for extra creaminess)
- 1 teaspoon Worcestershire sauce
- ½ teaspoon garlic powder
- ¼ teaspoon black pepper
- Optional coating: chopped parsley, nuts, or extra dried beef
Instructions
- Prepare the Base
In a large mixing bowl, add softened cream cheese and mix until smooth. - Add Flavor Ingredients
Stir in chopped dried beef, Worcestershire sauce, garlic powder, and black pepper. - Adjust Texture
Add milk or sour cream and mix until the mixture becomes creamy and well combined. - Shape the Cheese Ball
Form the mixture into a ball using your hands or a spoon. - Apply Coating (Optional)
Roll the cheese ball in chopped parsley, nuts, or extra dried beef for added texture and flavor. - Chill
Cover and refrigerate for at least 1–2 hours to firm up. - Serve
Serve chilled with crackers, bread, or fresh vegetables.