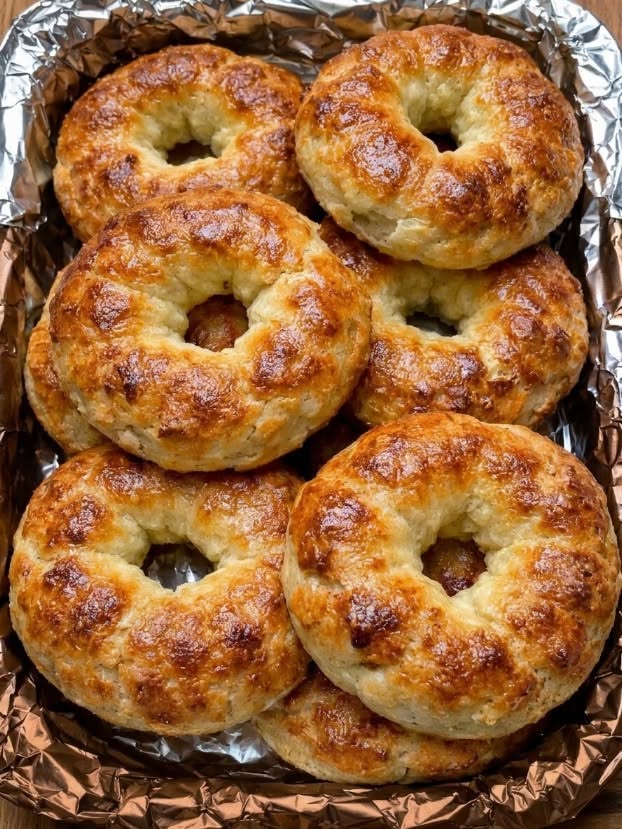
Part 1: Everything You Need to Know About Making Easy Greek Yogurt Bagels
There is something especially satisfying about eating a warm, freshly baked bagel, but traditional bagel recipes can seem like a project. Yeast, kneading, rising, boiling, shaping, and several hours of preparation are enough to make many home cooks reach for a packaged bagel instead.
This easy 2-ingredient Greek yogurt bagel recipe takes a much simpler approach.
With Greek yogurt and self-rising flour as the foundation, you can make homemade bagels without yeast and without waiting for dough to rise. The result is a quick, tender, slightly chewy bread that works beautifully for breakfast, brunch, lunch, or an afternoon snack.
These homemade Greek yogurt bagels are especially useful when you want fresh bread but do not have much time. The dough comes together quickly, the bagels can be shaped by hand, and they go straight into the oven. There is no complicated bread-making technique required.
Why This Simple Bagel Recipe Works So Well
The beauty of this recipe is its simplicity. Traditional bagels rely on yeast for fermentation and rising, while this quick version uses self-rising flour to provide the lift needed during baking. Greek yogurt brings moisture, tenderness, protein, and a pleasant tang to the dough.
The combination creates a dough that is remarkably easy to work with once you understand its texture.
The finished bagels will not be identical to a classic New York-style bagel because they are made without yeast and the traditional boiling step. Instead, expect a softer, breadier center with a lightly chewy exterior. They are particularly delicious when sliced and toasted.
If you are searching for easy homemade bagels without yeast, this is one of the simplest methods to try.
Choose the Right Greek Yogurt
Greek yogurt is an important part of the recipe, so its consistency matters.
A thick, plain Greek yogurt is the best choice. Because Greek yogurt contains less liquid than many regular yogurts, it helps produce a dough that is easier to shape.
If your yogurt is unusually thin or watery, the dough may become sticky. You may then be tempted to add a large amount of flour, but too much additional flour can make the finished bagels dry and heavy.
For that reason, use a thick Greek yogurt whenever possible and measure it carefully.
Plain yogurt is preferable because it provides a neutral flavor that works with both sweet and savory toppings.
Understanding Self-Rising Flour
Self-rising flour is another important ingredient because it simplifies the recipe. It already contains the leavening ingredients needed to help the dough puff during baking.
That is why you do not need yeast for these quick bagels.
If you normally keep self-rising flour in your pantry, this recipe can become an easy last-minute breakfast. The flour and Greek yogurt can be combined into a simple dough without preparing a separate yeast mixture.
If self-rising flour is unavailable, many versions of this recipe use all-purpose flour combined with baking powder and salt. However, because this recipe is designed around self-rising flour, keeping the ingredient as specified gives you the most straightforward preparation.
The Dough Should Feel Soft, Not Wet
One of the most important parts of making successful Greek yogurt bagels is learning what the dough should feel like.
When the flour and yogurt first come together, the mixture may appear rough, shaggy, or slightly sticky. That is normal.
Do not immediately add a large amount of flour.
Instead, bring the dough together gradually. Transfer it to a lightly floured surface and knead it gently until it becomes smoother and easier to handle.
The goal is a soft dough that can be shaped without completely sticking to your hands.
Adding too much flour is one of the easiest ways to turn these tender homemade bagels into dense ones. Use only enough flour to make the dough manageable.
Gentle Kneading Is Enough
Unlike traditional yeast bread, this dough does not need extensive kneading.
A couple of minutes of gentle kneading is generally sufficient to bring everything together. You are not trying to develop a highly elastic bread dough. You simply want the flour and yogurt evenly combined and the dough smooth enough to shape.
Overworking the dough can result in a heavier texture.
For this reason, knead only until the dough feels cohesive and reasonably smooth.
How to Shape Six Homemade Bagels
Once your dough is ready, divide it into six portions of approximately equal size.
Making the pieces similar in size helps the bagels bake at roughly the same rate.
Roll each portion into a rope. Aim for a rope around seven inches long, although exact measurements do not need to be perfect.
Bring the two ends together to create a ring. Pinch the ends firmly so they remain connected during baking.
Another easy shaping method is to form each portion into a ball and make a hole through the center with your finger. Gently stretch the opening until you have a bagel shape.
Whichever method you choose, avoid making the center hole too small. Dough expands in the oven, so a reasonably generous opening helps maintain the recognizable bagel shape.
Why Parchment Paper Helps
Line your baking sheet with parchment paper before arranging the shaped bagels.
Parchment provides a nonstick surface and makes cleanup easier. It also allows the bagels to bake evenly without sticking directly to the metal baking sheet.
Leave some room between each bagel because they will expand as they bake.
There is no need to overcrowd the tray.
Adding a Topping Before Baking
These bagels can be enjoyed plain, but toppings are an easy way to change their flavor.
If you want to add a topping, lightly brush the surface before sprinkling it on. A little yogurt or water can help toppings adhere to the dough.
Egg wash can also be used when available and is especially useful if you want a more golden, bakery-style finish.
Everything bagel seasoning is an obvious favorite, but sesame seeds, poppy seeds, or other suitable toppings can also work beautifully.
Because the base dough is relatively neutral, it can easily move from savory to sweet depending on how you serve it.
Baking the Bagels Until Golden
Bake the shaped bagels in a preheated oven at 375°F (190°C).
The baking time is approximately 20 to 25 minutes, although ovens can vary. Look for a lightly golden exterior and a center that feels baked rather than doughy.
If you want additional color on top, you can use the broiler briefly at the end. This step requires close attention because the difference between beautifully browned and overly dark can happen quickly.
Do not walk away while broiling.
Why Cooling Time Matters
Freshly baked bread continues to settle as it cools.
It may be tempting to slice into your bagel immediately, especially when it smells warm and delicious. However, allowing the bagels to rest for at least 10 minutes gives the interior time to finish setting.
This short cooling period can make the crumb easier to slice and helps prevent the center from seeming gummy.
Once slightly cooled, cut the bagel in half and serve it warm.
What Makes These Bagels Great for Breakfast?
These quick Greek yogurt bagels are extremely versatile.
For a classic breakfast, split one open and spread it with cream cheese, butter, strawberry jam, peanut butter, or honey.
For a more filling option, use the bagel as the base for a breakfast sandwich. Add scrambled eggs, cheese, turkey, or another favorite breakfast filling.
The mild flavor of the bagel also makes it a convenient foundation for lunch.
Easy Lunch Ideas With Homemade Bagels
Instead of using sliced bread, use these bagels for sandwiches.
Turkey and cheese make a simple combination. Chicken salad, tuna salad, and egg salad are also excellent choices.
To make the meal more balanced, add fresh vegetables or a side salad.
Because the bagels are sturdy enough to hold fillings, they can be particularly convenient for packed lunches.
Brunch Serving Ideas
These bagels also fit naturally into a weekend brunch spread.
Place a basket of warm bagels on the table and serve them with cream cheese, butter, jam, or honey. Add fresh fruit, scrambled eggs, crispy bacon, or yogurt parfaits for a more complete brunch.
For a casual gathering, prepare several toppings and let everyone customize their own bagel.
Ways to Change the Flavor
The basic bagel dough can be used as a starting point for different flavor combinations.
For a sweet variation, cinnamon and raisins can provide a warm, bakery-style flavor.
For a savory option, cheddar cheese can add richness. Fresh herbs can give the bagels a brighter flavor, while garlic and Parmesan create a more pronounced savory profile.
Everything bagel seasoning is ideal when you want the familiar combination of seeds, herbs, and seasoning.
For a spicy version, jalapeño and cheddar make a particularly flavorful pairing.
These additions should be treated as variations rather than replacements for the recipe’s core ingredients.
Tips for Better Homemade Bagels Every Time
Use thick Greek yogurt.
A thick yogurt produces a more manageable dough and helps prevent excessive stickiness.
Do not dump in extra flour.
If the dough feels sticky, add only a small amount of flour at a time. Too much can make the bagels dry.
Knead briefly.
The dough only needs enough kneading to become cohesive and smooth.
Make the bagel openings large enough.
The dough expands while baking, so a generous hole helps preserve the classic bagel appearance.
Secure the seams.
Pinch the ends firmly when forming the rings. A weak seam can separate during baking.
Keep the bagels evenly sized.
Dividing the dough into six similar portions helps them finish baking at approximately the same time.
Do not skip the cooling period.
Allowing the bagels to rest for about 10 minutes improves their final texture.
How to Store Homemade Greek Yogurt Bagels
These bagels are best when fresh, but you can store extras for later.
At room temperature, keep cooled bagels in an airtight container for up to two days.
For longer storage, refrigerate them for up to five days. Toasting them before serving can restore some of the pleasant warmth and texture.
For the longest storage period, freezing is the better option.
Allow the bagels to cool completely before placing them in an airtight freezer-safe bag or container. They can be frozen individually so you can remove only the number you need.
Frozen bagels can be reheated directly in a toaster or oven.
Can You Make These Bagels Ahead?
Yes. These are especially convenient for meal preparation because the finished bagels can be stored and reheated.
You can bake a batch at the beginning of the week, allow them to cool, and store them properly. When breakfast time arrives, simply slice and toast one.
For busy mornings, this makes homemade bread much more practical.
Can These Be Made Into Mini Bagels?
Absolutely.
Instead of dividing the dough into six portions, divide it into smaller pieces. Shape each one into a smaller ring and begin checking them earlier during baking.
Because smaller bagels require less time to cook through, the baking period may need to be reduced.
Mini bagels are particularly useful for brunch buffets, children’s meals, or snack trays.
Do These Bagels Need Yeast?
No.
That is one of the biggest advantages of this recipe.
Traditional bagels commonly rely on yeast and fermentation, but these no-yeast Greek yogurt bagels use self-rising flour instead. This eliminates the need for a lengthy rising period.
The result is a quick homemade bread recipe that can go from mixing bowl to oven in a relatively short amount of time.
Are Greek Yogurt Bagels the Same as Traditional Bagels?
Not exactly, and that is worth knowing before you make them.
Traditional bagels are generally boiled before baking, which contributes to their characteristic chewy crust. These quick Greek yogurt bagels skip that traditional process.
Their texture is therefore softer and more bread-like, while still offering a pleasant chew.
Think of them as a convenient homemade alternative rather than an exact replacement for a classic boiled bagel.
Approximate Nutrition
The nutrition information for homemade bagels varies according to the exact flour, Greek yogurt, toppings, and portion size used.
An approximate serving based on the supplied recipe is:
- Calories: 210
- Protein: 9g
- Carbohydrates: 34g
- Fat: 4g
- Fiber: 1g
- Sugar: 3g
- Sodium: 340mg
These numbers are estimates rather than laboratory measurements. Different brands and ingredient quantities can change the nutritional values considerably.
Final Takeaway
If you want easy homemade bagels without yeast, this Greek yogurt version is a practical recipe to keep in your collection.
The preparation is uncomplicated, the ingredient list is short, and there is no yeast-rising period to manage. Thick Greek yogurt gives the dough moisture and tenderness, while self-rising flour supplies the structure and lift.
The bagels can be served simply with butter or cream cheese, turned into breakfast sandwiches, filled with lunch favorites, or dressed up with flavorful toppings for brunch.
They are not intended to duplicate the texture of a traditional boiled bagel. Instead, they offer something different: a quick, accessible, homemade bagel-style bread that can be prepared when you want fresh baking without a complicated process.
For busy mornings, weekend brunches, packed lunches, or freezer-friendly meal preparation, these 2-ingredient Greek yogurt bagels are an easy recipe worth trying.
Part 2: Quick Recipe Card
2-Ingredient Greek Yogurt Bagels
Ingredients
- Self-rising flour
- Plain, thick Greek yogurt
- Egg, for brushing if desired
- Optional bagel toppings
Method
- Heat the oven to 375°F (190°C) and cover a baking sheet with parchment paper.
- Put the self-rising flour into a large bowl. Add the Greek yogurt and mix until a rough dough forms.
- Move the dough onto a lightly floured work surface. Knead gently for about 2 minutes, just until it becomes smoother. Avoid adding excessive flour.
- Divide the dough into 6 equal portions. Roll each portion into a rope about 7 inches long, then connect and firmly pinch the ends to form a ring.
- Place the shaped bagels on the prepared baking sheet, leaving space between them. If using toppings, brush the tops lightly with yogurt, water, or egg wash and sprinkle with your preferred topping.
- Bake for approximately 20–25 minutes, or until the bagels are lightly golden and cooked through. For deeper color, broil for 1–2 minutes, watching them carefully.
- Let the bagels cool for at least 10 minutes before slicing.
Recipe Details
- Prep Time: 10 minutes
- Bake Time: 20–25 minutes
- Total Time: About 35 minutes
- Yield: 6 bagels
- Difficulty: Easy
Serving Suggestions
Enjoy them with:
- Cream cheese
- Butter
- Strawberry jam
- Peanut butter
- Honey
- Turkey and cheese
- Chicken salad
- Tuna salad
- Egg salad
For brunch, serve alongside fresh fruit, scrambled eggs, crispy bacon, or yogurt parfaits.
Storage
- Room temperature: Store in an airtight container for up to 2 days.
- Refrigerator: Keep for up to 5 days and toast before serving.
- Freezer: Freeze cooled bagels for up to 3 months and reheat in a toaster or oven.