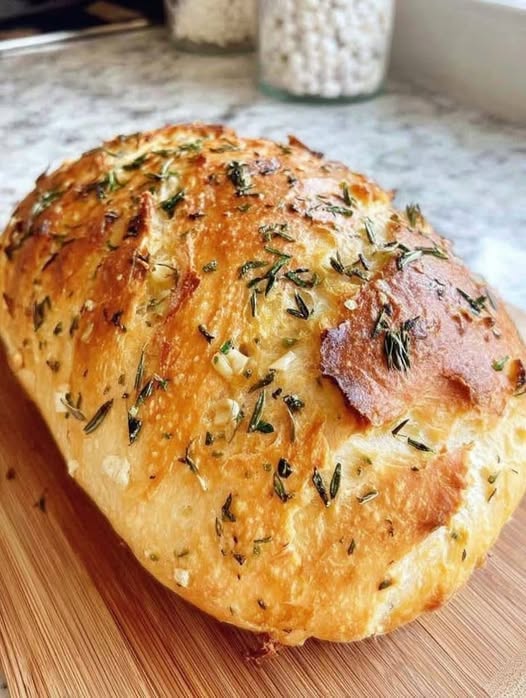
This No-Knead Rustic Garlic Bread recipe is perfect for anyone who wants fresh, bakery-style bread without spending time kneading dough. Made with simple pantry ingredients, fresh garlic, olive oil, and yeast, this homemade garlic bread develops a crisp golden crust and a soft, chewy center.
The secret is allowing the dough to rest and rise naturally. Instead of using complicated bread-making techniques, you simply mix the ingredients, let the yeast work, shape the dough gently, and bake it in a hot, covered Dutch oven. The result is rustic artisan bread with delicious garlic flavor in every slice.
This recipe is ideal for beginners, busy home cooks, and anyone who enjoys homemade bread with pasta, soup, salads, or family dinners. You can also customize the flavor with dried rosemary, Italian seasoning, fresh parsley, or an optional garlic butter finish.
Part 1: The Complete Guide to Making Rustic Garlic Bread at Home
1. Discover the Secret Behind No-Knead Garlic Bread
Homemade bread can seem intimidating, especially when traditional recipes call for extended kneading, repeated folding, and carefully timed preparation. Fortunately, no-knead bread offers a much simpler way to achieve excellent results.
The method relies on time rather than intensive physical effort. When flour and water are combined, the flour gradually absorbs moisture, and gluten proteins begin forming a network that gives bread its structure. During fermentation, yeast produces carbon dioxide, creating bubbles that help the dough expand and develop its characteristic texture.
For this rustic garlic bread recipe, you do not need to knead the dough until it becomes smooth and elastic. Instead, mix everything until the dry ingredients are incorporated, cover the bowl, and allow the dough to rest for approximately two to three hours.
At first, the mixture may look rough, sticky, and uneven. This is exactly what you should expect from a high-hydration dough. Avoid adding excessive flour simply because the dough feels different from conventional bread dough.
As the dough rises, it becomes airy and develops small bubbles. Once baked, these bubbles help create a tender interior with a pleasantly chewy texture.
Fresh garlic adds a savory aroma, while olive oil contributes subtle richness. Optional dried herbs provide an earthy, Mediterranean-inspired flavor that complements the bread without overpowering it.
The finished loaf has the appealing appearance of artisan bakery bread, with a crackly crust, irregular shape, and soft center. Best of all, the preparation process is straightforward enough for beginner bakers.
2. Reasons This Easy Homemade Garlic Bread Belongs in Your Kitchen
There are plenty of reasons to make rustic garlic bread from scratch. Its simple ingredients, flexible preparation, and delicious flavor make it suitable for everyday meals as well as special occasions.
No complicated kneading: You only need a large mixing bowl, a spoon, and a little patience. The resting period allows the dough to develop naturally.
Everyday baking ingredients: All-purpose flour or bread flour, water, yeast, salt, garlic, and olive oil form the foundation of the recipe. Optional dried herbs let you personalize the flavor.
A crunchy artisan crust: Baking the loaf in a preheated, covered Dutch oven traps steam during the first stage of baking. This helps the dough expand before the exterior becomes firm.
A soft and chewy center: Proper hydration and sufficient fermentation contribute to the bread’s appealing crumb.
Fresh garlic in every bite: Rather than relying entirely on garlic butter spread over finished bread, this recipe incorporates minced garlic directly into the dough.
Easy to customize: Rosemary, Italian seasoning, parsley, Parmesan, or a little chili can complement the basic recipe.
Perfect for sharing: A warm loaf makes a wonderful side dish for soups, pasta, roasted vegetables, and family-style dinners.
Another advantage is that the recipe can fit into a relaxed cooking schedule. You can mix the dough, leave it to rise while preparing other dishes, and bake the bread shortly before serving.
3. Selecting Flour for the Best Rustic Bread Texture
Flour plays an important role in determining how your homemade bread rises, feels, and tastes.
All-purpose flour is a reliable option for this recipe. It is widely available and produces bread with a tender interior and satisfying chew. If you are making no-knead bread for the first time, it is an excellent place to start.
Bread flour is another good choice. It generally contains more protein than all-purpose flour, which helps create a stronger gluten structure. This can contribute to a chewier texture and a loaf with an open, irregular crumb.
Both varieties work with the ingredient quantities provided in the recipe. However, flour brands differ in how much water they absorb, so the dough may feel slightly different depending on which one you use.
Whole-wheat flour can also be incorporated into rustic bread, although it absorbs more water and generally creates a denser loaf. For the most predictable results, use the specified all-purpose or bread flour rather than replacing all of it with whole-wheat flour.
Accurate measuring is especially important. Three cups of flour should weigh approximately 375 grams when using the recipe’s stated measurement. If you pack flour tightly into measuring cups, you may accidentally add too much, producing a heavier loaf.
For the most consistent results, use a kitchen scale whenever possible. Otherwise, fluff the flour, spoon it into the measuring cup, and level the top without pressing it down.
Remember that the dough should remain sticky. A soft, slightly messy mixture is preferable to a stiff dough that contains too much flour.
4. Understanding Yeast, Fermentation, and Rising Time
Yeast is responsible for helping bread rise and developing some of its characteristic flavor.
When yeast becomes active in the dough, it consumes available sugars and produces carbon dioxide. The developing gluten structure holds some of this gas, allowing the dough to expand and become airy.
Instant yeast is especially convenient because it can be mixed directly with the dry ingredients. This makes the preparation process quicker and eliminates the need for a separate activation step.
The recipe uses two teaspoons of instant yeast. Check the package’s expiration date and storage instructions to ensure that the yeast remains active.
Water temperature also matters. Lukewarm water is suitable for this recipe, while excessively hot water can damage the yeast. If you are unsure, use water that feels comfortably warm rather than hot.
Once all the ingredients have been mixed, cover the bowl and leave the dough at room temperature for approximately two to three hours. During this period, the dough should expand noticeably and develop bubbles across its surface.
However, rising time is not an exact measurement. A cooler kitchen may slow fermentation, while a warmer room can make the dough rise faster.
Instead of relying entirely on the clock, look for visual signs that fermentation is progressing well. The dough should appear puffier, lighter, and more aerated than it did immediately after mixing.
Do not rush this stage. Insufficient fermentation can produce a compact loaf with less volume, while excessive fermentation can weaken the dough and make shaping difficult.
5. Adding Fresh Garlic for Deep, Savory Flavor
Garlic is the defining ingredient that transforms a simple rustic loaf into homemade garlic bread.
Freshly minced garlic provides a distinctive savory aroma that pairs naturally with olive oil and herbs. Because the garlic is mixed directly into the dough, its flavor becomes distributed throughout the bread instead of remaining only on the surface.
The recipe calls for three to four cloves of finely minced garlic. Use three cloves for a balanced flavor or four if you prefer a stronger garlic taste.
Try to mince the garlic into small, even pieces. Large chunks may create concentrated pockets of flavor, while finely chopped garlic distributes more consistently.
If raw garlic tastes too strong for your preference, you can lightly sauté it in a little of the measured olive oil, then let it cool completely before incorporating it into the dough. This is an optional preparation variation, not a change required by the original method.
Avoid adding large amounts of extra garlic oil or other liquids. The dough depends on a particular balance of flour and water, and significant changes can affect its consistency and structure.
For an even more indulgent finish, brush the baked loaf with garlic butter while it is still warm. This creates an aromatic exterior and makes the crust especially appealing when served alongside pasta or soup.
6. Why Olive Oil Improves Homemade Artisan Bread
Olive oil complements the garlic and adds a subtle richness to the loaf. It can also contribute to a more tender crumb without turning the bread into a heavy, enriched roll.
The recipe uses one tablespoon of olive oil, which provides flavor while allowing the bread to retain its rustic character.
Extra-virgin olive oil is a good choice if you enjoy its fruity and slightly peppery notes. Regular olive oil also works well and usually has a milder flavor.
Because the dough contains a relatively small amount of oil, the finished bread remains suitable for serving with a wide variety of meals.
You can reserve additional olive oil for an optional finishing touch. Mix it with chopped parsley and a small pinch of salt, then brush it over the warm crust just before serving.
Alternatively, melted garlic butter can provide a richer finish. For a dairy-free version, simply use olive oil instead of butter.
7. Mixing the Dough Without Kneading
The preparation method is simple, but understanding the expected dough consistency will make the process easier.
Begin by choosing a large mixing bowl with enough room for the dough to expand. Add the flour, instant yeast, salt, and optional dried rosemary or Italian seasoning. Stir the dry ingredients together so the yeast and salt are distributed throughout the flour.
Next, pour in the lukewarm water and olive oil. Add the finely minced garlic and stir everything together with a wooden spoon or sturdy spatula.
Continue mixing until the flour is moistened and no large patches of dry flour remain. You do not need to knead the mixture or work it into a smooth ball.
The dough should look shaggy, soft, and sticky. It may cling to the spoon and appear less structured than conventional bread dough. Resist the temptation to add extra flour simply to make it easier to handle.
Cover the bowl with plastic wrap or a clean kitchen towel. Leave it in a comfortable room-temperature location until the dough has risen and looks bubbly.
During the resting period, the flour absorbs water, fermentation develops the dough, and the garlic flavor begins to spread throughout the mixture.
This hands-off approach is what makes no-knead rustic garlic bread such a practical recipe for home bakers.
8. Preparing the Loaf for Shaping and Baking
Once the dough has risen sufficiently, it is ready to be shaped into a rustic loaf.
Lightly dust a clean work surface with flour. Gently transfer the dough onto the surface, taking care not to press out too much of the gas created during fermentation.
Because the dough is naturally sticky, use lightly floured hands or a dough scraper to make handling easier.
Fold the outer edges toward the center, working around the dough until it forms a rough round shape. Turn the dough seam-side down and gently bring it together into a loaf.
There is no need to make the loaf perfectly smooth or symmetrical. Rustic bread is meant to have a natural appearance, and small variations in its shape make each loaf distinctive.
Avoid excessive handling. Pressing, squeezing, or repeatedly reshaping the dough can remove some of the air bubbles that help create an open crumb.
Transfer the shaped loaf onto a piece of parchment paper. Allow it to rest for approximately 15 to 20 minutes while the oven and baking pot finish heating.
This brief rest gives the dough time to relax before it enters the oven.
9. The Secret to a Golden, Crunchy Bread Crust
A crisp crust is one of the most appealing features of homemade artisan bread. Achieving it at home becomes much easier when you understand the role of heat and steam.
A Dutch oven is particularly useful because it retains heat and traps moisture released by the dough during the early stage of baking.
This humid environment delays the formation of a firm outer crust, allowing the loaf to expand as the yeast-produced gases respond to the oven’s heat. Once the lid is removed, moisture escapes and the surface can become crisp and deeply golden.
For this recipe, preheat the oven to 425°F (220°C), with the empty Dutch oven and its lid inside if the cookware manufacturer’s instructions permit this method.
When the oven is ready, carefully remove the hot pot using suitable oven mitts. Lower the dough into it using the parchment paper, keeping your hands away from the hot sides.
Cover the pot and bake for 25 minutes. Then remove the lid and continue baking for another 10 to 15 minutes, until the crust is deep golden brown and crisp.
Always handle the hot pot carefully. Never place cold cookware into a hot oven or heat an empty vessel unless its manufacturer confirms that the cookware is suitable for this use.
If you do not own a Dutch oven, you can bake the loaf on a preheated baking sheet or baking stone. The crust may differ, but the bread can still turn out delicious.
10. Flavor Variations to Make This Garlic Loaf Your Own
One of the best things about baking bread at home is the freedom to personalize its flavor.
- Rosemary and garlic bread: Add the optional dried rosemary for an earthy, fragrant loaf that pairs beautifully with roasted vegetables and soups.
- Italian herb bread: Use dried Italian seasoning for a familiar combination of herbs that complements pasta dishes.
- Parmesan garlic bread: Sprinkle finely grated Parmesan over the loaf during the final minutes of baking, or serve it with Parmesan garlic butter.
- Spicy garlic bread: Add a small pinch of red pepper flakes for a gentle kick.
- Garlic butter crust: Brush the warm loaf with melted garlic butter for a richer, more traditional garlic-bread flavor.
- Fresh parsley finish: Combine chopped parsley with olive oil and lightly brush the mixture over the crust after baking.
When experimenting with additions, keep the original ingredient balance in mind. Large quantities of cheese, vegetables, or other moisture-rich ingredients can change the dough’s hydration and structure.
For your first attempt, make the recipe as written. Once you understand how the dough behaves, try one variation at a time.
11. Common Bread-Baking Problems and How to Prevent Them
Even an easy bread recipe can produce inconsistent results if a few important details are overlooked.
The dough feels too sticky. Sticky dough is normal for this recipe. Lightly flour your hands and work surface instead of adding large amounts of flour directly to the mixture.
The bread turns out dense. This may happen if the yeast is inactive, the dough has not risen enough, or too much flour has been added. Check yeast freshness, measure ingredients carefully, and allow the dough to become visibly aerated.
The dough does not rise. Cool temperatures can slow fermentation, but inactive yeast or excessively hot water can also be responsible. Give the dough additional time if the room is cool and check the yeast before making another batch.
The loaf spreads too much. A wet dough may spread slightly, but excessive spreading can occur when the dough is overproofed or lacks sufficient structure. Handle it gently during shaping and avoid allowing it to rise indefinitely.
The crust remains pale. Make sure the oven is fully preheated and remove the Dutch oven lid for the final 10 to 15 minutes of baking.
The crust becomes too hard. Avoid extending the uncovered baking time unnecessarily. Allow the loaf to cool on a wire rack so moisture can escape without becoming trapped underneath.
The center seems gummy. The loaf may need more baking time or additional cooling. If necessary, check the internal temperature with a thermometer; approximately 200–210°F (93–99°C) is a useful doneness range for a lean bread loaf.
The garlic flavor is too strong. Use three cloves rather than four, or try lightly sautéing the garlic before adding it to the dough.
The loaf loses its crisp crust during storage. This often happens when warm bread is sealed in plastic. Allow the loaf to cool completely before storing it.
With practice, you will become more familiar with the dough’s appearance and learn to recognize when it is ready for shaping and baking.
12. Delicious Meals to Serve With Rustic Garlic Bread
This homemade garlic bread is versatile enough to accompany many meals. Its savory flavor and chewy texture make it particularly enjoyable with dishes that contain sauces, broths, or roasted ingredients.
Pasta dinners: Serve thick slices with spaghetti, lasagna, baked ziti, or creamy Alfredo pasta. The bread is excellent for soaking up extra sauce.
Comforting soups: Pair it with tomato soup, lentil soup, creamy mushroom soup, or homemade vegetable soup for a satisfying meal.
Fresh salads: Enjoy a slice alongside a Caesar salad, garden salad, or tomato-and-cucumber salad. The crunchy crust provides a pleasant contrast to fresh vegetables.
Roasted vegetables: Serve it with roasted potatoes, zucchini, bell peppers, or mushrooms for a simple Mediterranean-inspired dinner.
Dips and spreads: Offer olive oil, balsamic vinegar, hummus, or a creamy herb dip for an easy appetizer.
Cheese boards: Cut the loaf into smaller slices and arrange them with cheese, olives, and fresh vegetables.
For a quick snack, slice the bread, brush each piece with garlic butter, and toast until the edges become crisp. You can also add grated cheese for an extra-rich finish.
13. Storing Leftover Bread Without Losing Its Flavor
Proper storage helps preserve the taste and texture of homemade bread.
First, allow the loaf to cool completely on a wire rack. Storing warm bread can trap steam, soften the crust, and create excess moisture inside the container.
If you plan to eat the bread within a day or two, keep it in a bread box or paper bag at room temperature. This helps preserve the crust better than tightly sealed plastic, although the exposed bread may gradually dry out.
A plastic bag can help retain moisture in the interior, but the crust will usually soften. Choose the storage method according to whether you prefer a crisp exterior or a softer loaf.
Refrigeration is generally unnecessary for ordinary homemade bread because it can accelerate staling.
For longer storage, slice the completely cooled loaf and freeze the slices in a well-sealed freezer-safe bag or container. Use parchment paper between slices if you want to remove individual portions easily. The bread is best enjoyed within approximately three months for quality.
14. Simple Ways to Reheat and Refresh Leftover Garlic Bread
The oven is an excellent choice when you want to restore some of the crust’s original crispness.
Preheat the oven to 350°F (175°C). Place the whole loaf or individual slices inside and warm until heated through. A whole loaf may require approximately 8 to 12 minutes, while thin slices generally need less time.
If the bread has dried out slightly, lightly sprinkle the crust with water before reheating. Use only a little moisture because too much can make the exterior soft rather than crisp.
For a faster option, warm individual slices in a skillet or toaster oven. Add a little olive oil, butter, or grated cheese after warming if desired.
Frozen slices can also be toasted directly from the freezer, although the heating time will vary according to their thickness and your appliance.
For the best eating experience, serve the bread warm while the crust is crisp and the interior remains soft.
15. Frequently Asked Questions About No-Knead Rustic Garlic Bread
Can I make rustic garlic bread without a Dutch oven?
Yes. Use a preheated baking sheet or baking stone. If you want additional steam, you can use a separate oven-safe metal pan with hot water, provided your oven manufacturer’s instructions allow this method. Never pour water onto oven glass or a hot baking stone.
Can I prepare the dough the night before?
Yes. You can refrigerate the covered dough for a slower fermentation. Because the dough will rise more slowly in the refrigerator, its timing will change. Allow it to warm and become ready for shaping before baking, and judge its condition by appearance rather than relying only on the clock.
Why is my no-knead bread dense?
Inactive yeast, insufficient rising time, excessive flour, and rough handling can all contribute to dense bread. Measure accurately and allow the dough to become visibly puffy before shaping.
Can garlic powder replace fresh garlic?
Garlic powder can be used if fresh garlic is unavailable, but the taste will be different. Begin with a modest amount because dried garlic has a concentrated flavor. Fresh minced garlic remains the preferred ingredient for the recipe as written.
How can I tell when the bread is fully baked?
The crust should be deeply golden brown and firm. The loaf should feel relatively light for its size. A thermometer reading of approximately 200–210°F (93–99°C) in the center can also help confirm doneness.
Why must I cool the bread before cutting it?
Cooling allows the bread’s internal structure to finish setting. Cutting too early can compress the crumb and make the center seem sticky or gummy.
Is this garlic bread dairy-free?
Yes. The basic dough contains no dairy ingredients. Use olive oil rather than butter for any optional finishing step, and check the labels of any additional ingredients.
What makes this different from traditional garlic bread?
Traditional garlic bread is often made by spreading garlic butter over an already-baked loaf. This recipe incorporates minced garlic into the dough itself, producing a more evenly distributed garlic flavor throughout the bread.
Can I use dried herbs instead of fresh herbs?
Yes. The recipe includes optional dried rosemary or Italian seasoning. Fresh parsley can also be used as an optional finishing garnish after baking.
Can I make the crust extra crispy?
Use a fully preheated oven and covered baking pot for the initial baking stage, then remove the lid for the final 10 to 15 minutes. Allow the loaf to cool on a wire rack rather than leaving it in a covered container.
Part 2: Easy No-Knead Rustic Garlic Bread Recipe Card
No-Knead Rustic Garlic Bread
Homemade artisan bread with fresh garlic, a golden crust, and a soft, chewy center.
Prep time
15 minutes
Rise time
2–3 hours
Bake time
35–40 minutes
Yield
1 large loaf
Ingredients
- 3 cups (375 g) all-purpose flour or bread flour
- 1½ cups (360 ml) lukewarm water
- 2 teaspoons instant yeast
- 1½ teaspoons salt
- 3–4 cloves garlic, finely minced
- 1 tablespoon olive oil
- 1 teaspoon dried rosemary or Italian seasoning (optional)
- Extra flour, for shaping
- Additional olive oil or garlic butter, for brushing (optional)
Step-by-Step Instructions
1. Combine the dry ingredients. In a large mixing bowl, mix the flour, instant yeast, salt, and optional dried herbs until evenly distributed.
2. Add the liquids and garlic. Pour in the lukewarm water and olive oil. Add the minced garlic and stir with a wooden spoon until a sticky, shaggy dough forms. Make sure no large patches of dry flour remain.
3. Allow the dough to rise. Cover the bowl with plastic wrap or a clean kitchen towel. Leave it at room temperature for approximately 2–3 hours, or until the dough looks noticeably larger and bubbly.
4. Heat the oven. Preheat the oven to 425°F (220°C). Place a Dutch oven and its lid inside while the oven heats, provided the cookware is designed for this use.
5. Shape the loaf. Lightly flour your work surface and carefully transfer the dough onto it. Fold the edges toward the center and gently shape the dough into a round loaf. Avoid pressing out too much air.
6. Let the shaped dough rest. Place the loaf seam-side down on parchment paper. Leave it to rest for 15–20 minutes while the oven finishes heating.
7. Transfer the dough carefully. Wearing oven mitts, remove the hot Dutch oven. Lower the dough into the pot using the parchment paper, then cover with the lid.
8. Bake with the lid on. Bake for 25 minutes. The trapped steam helps the bread expand and develop its structure.
9. Finish baking uncovered. Remove the lid and bake for another 10–15 minutes, until the crust becomes crisp and deep golden brown.
10. Cool before slicing. Transfer the finished loaf to a wire rack and allow it to cool for at least 30–45 minutes before cutting.
11. Add the finishing touch. If desired, brush the warm crust with olive oil or garlic butter. Sprinkle with fresh parsley for extra flavor.
Helpful Recipe Notes
- Keep the dough slightly sticky; adding too much flour can make the bread dense.
- Use three garlic cloves for a balanced taste or four for a stronger garlic flavor.
- Rising time depends on room temperature and yeast activity.
- For the best crust, use a preheated covered pot suitable for high-temperature baking.
- Allow the loaf to cool completely before storing.
- Store at room temperature for approximately 1–2 days, or freeze well-wrapped slices for longer storage.
Approximate Nutrition Information
Estimated values per slice, assuming the loaf is divided into 10 slices:
| Nutrient | Amount |
|---|---|
| Calories | 150–170 |
| Carbohydrates | 29–33 g |
| Protein | 4–5 g |
| Fat | 2–3 g |
| Fiber | 1–2 g |
| Sodium |