Introduction: The Best Homemade Gluten-Free Biscuits You’ll Ever Bake
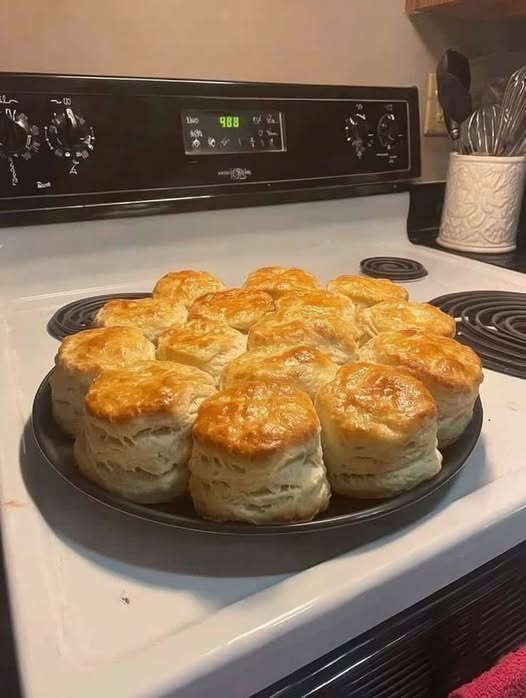
If you are searching for the best gluten-free buttermilk biscuits recipe, you are in the right place. These biscuits are soft on the inside, beautifully golden on the outside, and packed with rich buttery layers that make them irresistible. Whether you need a quick gluten-free breakfast idea, a comforting side for dinner, or a base for sandwiches, this recipe delivers bakery-style results at home.
Unlike traditional biscuits, gluten-free baking requires a slightly different technique, but the reward is absolutely worth it. When handled correctly, a gluten-free biscuit dough made with cold butter and buttermilk produces a tender, flaky texture that rivals any classic Southern biscuit recipe.
This version is carefully designed to be beginner-friendly, using a reliable gluten-free flour blend and simple baking techniques. The result is light, fluffy, and perfectly layered biscuits that taste amazing fresh out of the oven.
Why This Gluten-Free Biscuit Recipe Works So Well
The secret behind perfect gluten-free biscuits lies in three key elements:
- Cold fat (butter) creates steam pockets during baking, giving the biscuits their flaky layers.
- Buttermilk acidity reacts with baking soda and baking powder to help the dough rise higher.
- Minimal handling keeps the dough soft and prevents dense or heavy biscuits.
When combined correctly, these elements create bakery-quality results without gluten.
This recipe is especially popular for:
- Easy gluten-free breakfast biscuits
- Homemade flaky biscuit recipe without gluten
- Southern-style gluten-free biscuits
- Quick side dish for soups, gravies, or fried chicken
- Comfort food baking at home
Ingredients Breakdown (Original Recipe Rewritten for Clarity)
Dry Base Mix for Structure
To build the foundation of these biscuits, you will need:
- 2 cups gluten-free all-purpose flour blend (must include xanthan gum; if not included, add 1 teaspoon separately)
- 1 tablespoon gluten-free baking powder
- ½ teaspoon baking soda
- 1 teaspoon fine salt
- 1 teaspoon granulated sugar (optional, for a subtle hint of sweetness)
These dry ingredients work together to create lift, structure, and balanced flavor. The baking powder and baking soda act as leavening agents, ensuring your biscuits rise properly even without gluten.
Cold Butter for Flaky Layers
- ½ cup unsalted butter (very cold, cut into small cubes)
Optional variation: You may replace half of the butter with chilled vegetable shortening to enhance flakiness and create a more tender crumb.
Cold butter is essential. As it melts in the oven, it releases steam that forms airy layers inside the biscuit.
Buttermilk for Softness and Tang
- ¾ to 1 cup cold buttermilk (add gradually)
Buttermilk not only adds moisture but also reacts chemically with leavening agents, helping the biscuits rise tall and soft. Always add it slowly to control dough consistency.
Optional Finishing Touch
- 2 tablespoons melted butter (for brushing after baking)
This step enhances flavor, adds shine, and gives that irresistible golden bakery-style finish.
Essential Baking Tools for Best Results
To make the process smooth and easy, prepare:
- Large mixing bowl
- Measuring cups and spoons
- Whisk or fork
- Pastry cutter or fork for butter mixing
- Rolling pin (optional)
- Biscuit cutter or round glass
- Baking tray
- Parchment paper
- Pastry brush
Step-by-Step Method for Perfect Gluten-Free Buttermilk Biscuits
Step 1: Preheat for Proper Rise
Set your oven to 425°F (220°C). A hot oven is critical because biscuits need instant heat to rise quickly and develop a golden crust.
Line your baking tray with parchment paper to prevent sticking and promote even browning.
Step 2: Combine Dry Ingredients Thoroughly
In a large bowl, whisk together gluten-free flour, baking powder, baking soda, salt, and optional sugar.
Mixing evenly ensures the leavening agents are distributed properly. This step is key for consistent rising and texture in every bite.
Step 3: Cut in Cold Butter for Flakiness
Add cold butter cubes into the flour mixture. Using a pastry cutter or your fingertips, gently break the butter into the flour until the texture resembles coarse crumbs with visible pea-sized butter pieces.
Do not overmix. These butter chunks are what create flaky layers during baking.
Step 4: Add Buttermilk Gradually
Pour in ¾ cup cold buttermilk first, mixing lightly. Add more, one tablespoon at a time, until a soft dough forms.
The dough should feel slightly sticky but not wet. Overmixing or overhydrating will lead to dense biscuits.
Step 5: Shape Dough Gently (No Kneading Required)
Lightly dust your surface with gluten-free flour. Turn out the dough and press it gently into a rectangle about 1 inch thick.
Avoid kneading. Gluten-free dough is delicate and needs gentle handling.
Step 6: Create Layers for Bakery-Style Texture
Fold the dough in half, press it down, and repeat this process 2–3 times.
This folding technique builds natural layers inside the biscuit, making them fluffy and flaky.
Step 7: Cut Without Twisting
Use a biscuit cutter or glass to press straight down into the dough.
Do not twist the cutter. Twisting seals the edges and prevents proper rising.
Reform scraps gently and cut additional biscuits.
Step 8: Arrange for Soft Sides and Better Rise
Place biscuits close together on the tray so their edges touch slightly.
This helps them rise upward instead of spreading outward, creating soft sides and tall height.
Step 9: Bake Until Golden Perfection
Bake for 12–15 minutes or until the tops are lightly golden brown.
The inside should remain soft, fluffy, and fully cooked without dryness.
Step 10: Final Butter Glaze
Brush warm biscuits with melted butter immediately after baking.
This enhances flavor, softness, and gives a bakery-style glossy finish.
Let cool for a few minutes before serving.
Expert Baking Science Tips for Perfect Results
- Always use very cold butter for maximum flakiness
- Keep buttermilk chilled before mixing
- Handle dough as little as possible
- Use parchment paper for even baking
- Do not overbake or biscuits will dry out
- Fold dough to create visible layers
- Bake immediately after shaping for best rise
Common Mistakes and How to Avoid Them
- Dense biscuits? You likely overmixed the dough
- Flat biscuits? Butter may have been too warm
- Dry texture? Too much flour or overbaking
- Crumbly dough? Add buttermilk gradually to adjust moisture
Creative Variations for Flavor Enhancement
You can customize this gluten-free biscuit recipe easily:
- Cheddar biscuits: Add shredded sharp cheddar
- Herb biscuits: Add rosemary, thyme, or parsley
- Dairy-free option: Use plant-based butter and dairy-free buttermilk (plant milk + lemon juice)
- Drop biscuits: Skip rolling and scoop dough directly onto tray
Serving Ideas for Gluten-Free Buttermilk Biscuits
These biscuits pair beautifully with:
- Butter and jam
- Honey or maple syrup
- Sausage gravy
- Fried or scrambled eggs
- Chicken dishes
- Soups and stews
- Chili bowls
- Breakfast sandwiches
Storage and Reheating Guide
Store biscuits in an airtight container:
- Room temperature: up to 2 days
- Refrigerator: up to 5 days
- Freezer: up to 3 months
Reheat in oven at 350°F (175°C) for about 8 minutes or microwave briefly for softness.
Part 2: Simple Gluten-Free Buttermilk Biscuits Recipe Card
Ingredients
Dry Mix
- 2 cups gluten-free all-purpose flour blend (with xanthan gum; if not included add 1 teaspoon xanthan gum)
- 1 tablespoon gluten-free baking powder
- ½ teaspoon baking soda
- 1 teaspoon fine salt
- 1 teaspoon granulated sugar (optional)
Fat
- ½ cup cold unsalted butter, cut into cubes
(Optional: replace half with chilled vegetable shortening for extra flakiness)
Liquid
- ¾ to 1 cup cold buttermilk (add gradually)
Optional Finish
- 2 tablespoons melted butter for brushing
Quick Method
- Preheat oven to 425°F (220°C). Line baking tray.
- Mix dry ingredients in a bowl.
- Cut in cold butter until crumbly.
- Add buttermilk slowly until dough forms.
- Shape dough gently (do not knead).
- Fold 2–3 times for flaky layers.
- Cut biscuits without twisting.
- Place close together on tray.
- Bake 12–15 minutes until golden.
- Brush with melted butter and serve warm.