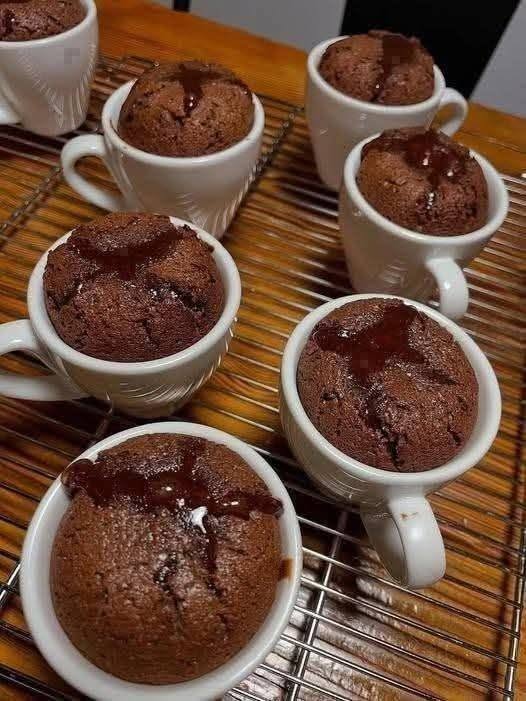
Part 1 — The Complete Guide to Making a Perfect Chocolate Mug Cake
A Little Chocolate Cake Made Just for You
Sometimes you want chocolate cake, but making a whole cake feels like far too much work. You may not want to measure a long list of ingredients, turn on the oven, wait for a cake to bake, and then spend time cleaning several mixing bowls. That is where an easy chocolate mug cake becomes such a wonderful option.
This chocolate mug cake recipe gives you the comfort of a warm homemade chocolate cake without requiring a full-size baking project. Everything comes together in a microwave-safe mug, making it an excellent choice for a quick dessert, an afternoon sweet treat, a late-night chocolate craving, or a simple dessert for one.
The beauty of a microwave mug cake is its simplicity. Flour, sugar, unsweetened cocoa powder, baking powder, salt, milk, butter or coconut oil, vanilla and chocolate chips can be transformed into a soft chocolate dessert in a remarkably short time. You do not need a stand mixer or a large baking pan. A mug, fork or small whisk, measuring spoons and a microwave are enough.
This recipe is especially useful for beginners because the process is straightforward. You combine the dry ingredients, add the wet ingredients, mix until the batter is smooth, add chocolate chips, and microwave the cake. The result is a warm individual chocolate cake with a tender texture and little pockets of melted chocolate.
Why Chocolate Mug Cake Is Such a Popular Quick Dessert
A homemade chocolate mug cake has one major advantage over traditional cake: speed.
Traditional chocolate cake can require preparation, oven preheating, baking time and cooling. A mug cake is designed around convenience. Because the batter is prepared in a single serving, the microwave can cook it very quickly.
This makes a chocolate mug cake particularly appealing when you want:
- A quick chocolate dessert
- A single-serving cake
- An easy microwave recipe
- A homemade sweet treat
- A simple dessert without an oven
- A warm chocolate snack
- A beginner-friendly baking recipe
- A portion-sized chocolate cake
The recipe also creates less washing up. Instead of filling your kitchen with bowls and baking equipment, you can prepare the batter directly inside the mug.
There is also something enjoyable about watching the cake rise in the microwave. The batter begins as a dark, smooth mixture and quickly expands as the baking powder helps create a lighter texture. Once the cooking time is complete, the chocolate aroma makes the short wait worthwhile.
The Secret Behind a Soft and Moist Mug Cake
One of the biggest challenges with microwave cakes is avoiding an overly dry or rubbery texture. A microwave cooks food quickly, so a few extra seconds can make a noticeable difference.
This recipe uses several ingredients that help create a softer result. Milk contributes moisture, while melted butter or coconut oil adds richness. Baking powder helps the batter rise, and the combination of cocoa powder and chocolate chips gives the cake its deep chocolate character.
The small amount of water added to the center is another interesting feature of this recipe. Rather than mixing the water into the batter, it is placed over the center before microwaving. This technique is intended to help maintain moisture in the middle while the cake cooks.
Timing is still important. A microwave mug cake should be cooked only until the cake has risen and the surface appears set around the edges. The exact cooking time can vary because microwaves have different power levels.
For that reason, the stated 70-second cooking time should be treated as a starting point rather than an absolute rule for every microwave.
Choosing the Right Mug
The mug you choose can affect the final result.
Use a microwave-safe ceramic mug with enough room for the batter to rise. A mug holding approximately 12 ounces or more gives the cake space to expand during cooking.
Avoid filling the mug too close to the top. Even a small amount of batter can rise considerably in the microwave.
Before beginning, make sure the mug is clean and dry. A straight-sided mug can also make mixing easier because you can reach the bottom with a fork.
Never use a mug or container that contains metallic decoration unless it is specifically labeled microwave-safe.
Understanding the Ingredients
Although the ingredient list is short, every component has a purpose.
All-purpose flour provides the main structure of the cake. It forms the foundation of the batter and helps the dessert hold its shape after cooking.
Granulated white sugar or raw organic sugar adds sweetness and contributes to the soft texture of the finished cake.
Unsweetened cocoa powder gives the mug cake its recognizable chocolate flavor and deep color. Because it is unsweetened, the sugar balances its natural bitterness.
Baking powder helps the cake rise. Without a leavening ingredient, the batter would be much denser.
Fine sea salt may seem insignificant, but a small pinch helps balance sweetness and makes the chocolate flavor more pronounced.
Whole milk provides moisture and helps bring the dry ingredients together into a smooth batter.
Melted unsalted butter or coconut oil supplies richness and contributes to the tender texture.
Vanilla extract adds aroma and rounds out the chocolate flavor.
Semi-sweet chocolate chips or dark cocoa drops create little pockets of extra chocolate throughout the cake.
Water is placed in the center rather than blended into the batter. It is part of the moisture-focused method used in this particular mug cake.
How to Mix the Batter Correctly
The mixing stage is simple, but it deserves attention.
Start by combining the flour, sugar, cocoa powder, baking powder and salt. Mixing these ingredients before adding liquids helps distribute the cocoa and baking powder throughout the flour.
This is particularly important with cocoa powder because small dry pockets can remain hidden at the bottom of the mug.
Once the dry ingredients are combined, add the milk, melted butter or coconut oil and vanilla.
Use a fork or small whisk to mix from the bottom upward. Scrape around the sides and bottom of the mug as you stir. Continue until you have a fairly smooth chocolate batter.
You do not need to beat the batter aggressively. The goal is simply to eliminate obvious dry flour or cocoa pockets.
Overmixing is unnecessary. Once the ingredients are evenly incorporated, stop stirring.
Adding Chocolate Chips for Extra Chocolate Flavor
Chocolate chips take this simple dessert to another level.
The recipe calls for one tablespoon of semi-sweet chocolate chips or dark cocoa drops. Scatter them over the batter and gently press some into the mixture.
During microwaving, the chocolate pieces become soft and melted. This gives the finished cake a more indulgent texture than cocoa powder alone.
If you enjoy a stronger chocolate flavor, dark chocolate chips are a natural choice. Semi-sweet chips provide a slightly sweeter result.
The important thing is to keep the quantity consistent if you want to follow the original recipe exactly.
The Center-Water Technique
After adding the chocolate chips, place one tablespoon of clean drinking water in the center of the batter.
Do not stir it through the cake mixture.
This is one of the defining techniques in this recipe. The water remains concentrated near the center as the cake cooks, helping create a softer, more moist area.
Because microwaves vary, the final texture may differ slightly between appliances. If your cake looks noticeably wet after the cooking period, give it a little additional cooking time rather than assuming every microwave needs exactly the same duration.
Getting the Microwave Timing Right
Place the mug in the center of the microwave and cook it at the standard high setting for approximately 70 seconds.
Watch the cake as it cooks. It should rise above the batter level and become visibly more structured.
When the microwave stops, allow the cake to sit for about 30 seconds before removing it.
This resting period gives the cake a moment to settle and allows the heat to distribute through the center.
Microwave cooking is different from conventional oven baking. The exact time can depend on the microwave’s wattage, the size and shape of the mug, and the temperature of the ingredients.
If your microwave is particularly powerful, the cake may need less time. If it is lower powered, it may require slightly longer.
How to Tell When Your Mug Cake Is Done
A properly cooked chocolate mug cake should look mostly set on top.
The outer area should appear cooked and structured, while the center can remain slightly moist. The chocolate chips may still look soft or melted.
You do not want to continue microwaving until every part looks completely dry. Doing so can produce a tough cake.
Remember that the mug and cake remain hot after the microwave stops. The dessert continues to cook slightly from residual heat while it rests.
When removing the mug, use a dry cloth or heat-resistant mitt. Ceramic can become extremely hot in the microwave.
Let It Cool Before Taking the First Bite
It may be tempting to eat the cake immediately, especially when the chocolate aroma fills the kitchen.
Give it a couple of minutes first.
The chocolate chips can become extremely hot, and the center of the cake may hold heat longer than the surface. A short cooling period makes the dessert safer and also allows the texture to settle.
Once it has cooled slightly, you can enjoy it directly from the mug with a spoon.
That is part of the charm of this recipe: there is no need to transfer the cake to another plate.
Simple Ways to Serve Your Chocolate Mug Cake
This mug cake is delicious by itself, but you can also dress it up when you want something more special.
A light dusting of powdered sugar can provide a simple finishing touch. Whipped cream adds a cool contrast to the warm cake, while a scoop of vanilla ice cream creates the classic combination of hot chocolate cake and cold creamy topping.
You could also serve it with fresh berries for a contrast between rich chocolate and bright fruit.
For a more chocolate-focused dessert, a small drizzle of chocolate sauce can be added after cooking.
However, remember that additional toppings change the nutritional values of the original recipe.
Flavor Ideas for Chocolate Lovers
Once you understand the basic chocolate mug cake method, you can experiment with flavors while keeping the core recipe intact.
A tiny amount of instant espresso powder can make chocolate taste deeper and more intense. Coffee and cocoa complement each other particularly well.
A small amount of almond extract can introduce a nutty aroma.
Peanut butter can also be placed in the center before microwaving for a chocolate-and-peanut-butter combination.
Hazelnut cocoa spread is another possible filling for people who enjoy a richer dessert.
These additions are optional. The original recipe already provides a strong chocolate profile through cocoa powder and chocolate chips.
How to Avoid a Rubbery Microwave Cake
The most common mistake with mug cakes is overcooking.
Because the serving is small, microwave cooking happens quickly. Adding extra time simply because the cake still looks soft can result in a firm or rubbery texture.
Start with the recommended cooking time and examine the cake afterward.
Another important point is not to pack flour into the measuring spoon. Spoon the flour into the tablespoon and level it. Too much flour can make a mug cake dry.
Also make sure the baking powder is fresh. Old leavening agents may not provide enough lift.
Finally, mix the ingredients thoroughly enough to remove dry pockets but avoid excessive stirring.
Why Fresh Ingredients Matter
Fresh pantry ingredients can make a noticeable difference in homemade baking.
Cocoa powder should smell pleasantly chocolatey rather than stale. Flour should be stored properly and used within its recommended freshness period. Baking powder should be active enough to provide a good rise.
Milk should be fresh and suitable for your dietary needs.
Butter should be unsalted if you are following the exact ingredient balance because the recipe already includes a pinch of sea salt.
Vanilla extract should also have a pleasant aroma because even a small amount can influence the finished dessert.
A Convenient Dessert for Busy Days
One reason this recipe works so well for modern home cooking is that it fits into a busy schedule.
You can prepare the batter in a few minutes without planning an entire baking session. There is no need to wait for an oven to preheat, and there is no large cake sitting on the counter afterward.
A single serving also makes it easier to prepare dessert when you are cooking for yourself.
It can be an enjoyable afternoon treat, a simple after-dinner dessert or a cozy addition to a movie night.
The recipe is also approachable for teenagers and beginner home cooks when appropriate adult supervision is used around hot appliances.
What Makes This Recipe Different From a Cake Mix?
A boxed cake mix can certainly be convenient, but this recipe focuses on combining individual ingredients directly in the mug.
That gives you greater control over the ingredients and allows you to make exactly one serving.
You can also select the type of cocoa powder, milk, butter or coconut oil and chocolate chips you prefer.
There is something satisfying about starting with basic ingredients and ending with a warm chocolate dessert only a short time later.
A Few Practical Tips for Consistent Results
For the best results, keep these points in mind:
- Use a large microwave-safe mug.
- Measure the flour and cocoa powder accurately.
- Mix the dry ingredients before adding liquids.
- Scrape the bottom of the mug while stirring.
- Mix until no obvious dry pockets remain.
- Add chocolate chips after the batter is smooth.
- Keep the tablespoon of water in the center and do not stir it in.
- Begin with approximately 70 seconds of microwave cooking.
- Allow the cake to rest before removing it.
- Cool briefly before eating because the center can be very hot.
These small details can make a significant difference in the finished texture.
Is This Really a Single-Serving Chocolate Cake?
Yes. The ingredient quantities are designed around one mug cake.
That makes this recipe different from traditional cakes, which are generally prepared for several servings.
A single-serving dessert can be useful when you want something sweet without making an entire cake. However, “single serving” does not automatically mean low-calorie or healthy. The recipe contains flour, sugar, butter or coconut oil and chocolate, so it should simply be enjoyed as a dessert.
The original nutrition information should also be treated as an estimate because the nutritional value of ingredients can differ between brands.
Nutritional Perspective
The original recipe provides an estimated nutritional profile for the complete mug cake, but the actual values can change according to the ingredients selected.
For example, different brands of cocoa powder, chocolate chips, flour and milk may have different calorie, sugar, fat and protein levels.
Adding whipped cream, ice cream, powdered sugar, chocolate sauce or other toppings will also increase the overall nutritional content.
For accurate dietary tracking, use the nutrition information printed on your specific ingredient packages and calculate the complete recipe based on the exact quantities used.
A Note About Health Claims
Chocolate mug cake is best understood as a homemade dessert rather than a health food.
Cocoa powder does contain naturally occurring minerals and plant compounds, and milk contributes nutrients such as calcium and protein. However, the recipe also contains added sugar and fats.
It would therefore be misleading to describe this dessert as a treatment for health conditions, a guaranteed source of energy, or a substitute for a balanced meal.
Enjoying a homemade dessert can absolutely be part of a varied diet, but individual nutritional needs are different.
Why Homemade Desserts Feel So Special
There is something comforting about making dessert from scratch.
You measure each ingredient yourself, mix the batter, watch it rise and finally enjoy the result while it is still warm.
A chocolate mug cake captures that experience without requiring the time commitment of traditional baking.
It is small, quick and uncomplicated, yet it still gives you the familiar aroma and texture associated with homemade chocolate cake.
That combination is what makes this recipe worth keeping in your collection.
Final Thoughts Before You Start
If you are searching for an easy chocolate mug cake recipe, this method is a practical place to begin.
It combines familiar ingredients with a fast microwave cooking method to create a warm, soft and chocolate-filled dessert in a single mug.
The key to success is not complicated equipment. Accurate measurements, thorough mixing, suitable microwave cookware and careful cooking time are much more important.
Start with the exact ingredient quantities below, use approximately 70 seconds as your initial cooking time, and remember that your microwave may require a small adjustment.
Once you become familiar with your microwave and mug, this can become one of those dependable recipes you turn to whenever a chocolate craving appears.
The best part is that you can enjoy your homemade chocolate cake while it is fresh, warm and fragrant—without preparing an entire cake.
Part 2 — Simple Chocolate Mug Cake Recipe
Ingredients
- 4 tablespoons all-purpose white flour
- 3 tablespoons granulated white sugar or raw organic sugar
- 2 tablespoons pure unsweetened cocoa powder
- ½ teaspoon baking powder
- 1 pinch fine sea salt
- 3 tablespoons fresh whole milk, room temperature
- 1 tablespoon melted unsalted butter or pure coconut oil
- ¼ teaspoon pure vanilla extract
- 1 tablespoon semi-sweet chocolate chips or dark cocoa drops
- 1 tablespoon clean drinking water
Quick Method
- Prepare the mug: Use a clean, dry microwave-safe ceramic mug that holds at least 12 ounces.
- Combine dry ingredients: Add flour, sugar, cocoa powder, baking powder and sea salt. Stir with a fork until evenly combined.
- Add wet ingredients: Pour in the milk, melted butter or coconut oil and vanilla extract.
- Make the batter: Stir thoroughly from the bottom upward until you have a smooth chocolate batter with no obvious dry flour or cocoa pockets.
- Add chocolate chips: Sprinkle the chocolate chips over the batter and gently press some into the mixture.
- Add water: Pour 1 tablespoon of water directly into the center. Do not stir it in.
- Microwave: Place the mug in the microwave and cook on high for approximately 70 seconds.
- Rest: Leave the mug cake inside the closed microwave for about 30 seconds after cooking.
- Check: The outside should look set while the center may remain slightly moist.
- Cool and serve: Carefully remove the hot mug using a dry cloth or heat-resistant mitt. Let the cake cool for about 2 minutes, then serve warm.
Optional Serving Ideas
Enjoy the mug cake as it is, or top it with powdered sugar, whipped cream, vanilla ice cream, fresh berries, chocolate sauce or your favorite dessert topping.
Estimated Nutrition Per Mug Cake
| Nutrient | Approximate Amount |
|---|---|
| Calories | 310 kcal |
| Total Fat | 12 g |
| Saturated Fat | 7 g |
| Cholesterol | 20 mg |
| Sodium | 180 mg |
| Total Carbohydrates | 46 g |
| Dietary Fiber | 3 g |
| Sugars | 24 g |
| Protein | 5 g |
Nutrition values are estimates and can vary according to brands, ingredient substitutions and toppings.
Important Recipe Note
Microwave power varies from one appliance to another. The 70-second cooking time is a starting point based on the original recipe. If your microwave is especially powerful, check the cake earlier; if the center is still substantially uncooked, continue heating in short increments.
The mug, cake and melted chocolate may be very hot immediately after cooking, so allow the dessert to cool before eating.
Disclaimer
This recipe is intended as a general home-cooking guide and not as medical or nutritional advice. Individual dietary requirements vary. Anyone with food allergies or dietary restrictions should check the ingredients carefully before preparing the recipe. The nutrition figures are estimates rather than laboratory measurements.
Source
Source: Rewritten and substantially restructured from the recipe text supplied in the user’s original draft. The wording, organization, headings and explanations above are newly written rather than copied from the supplied text.