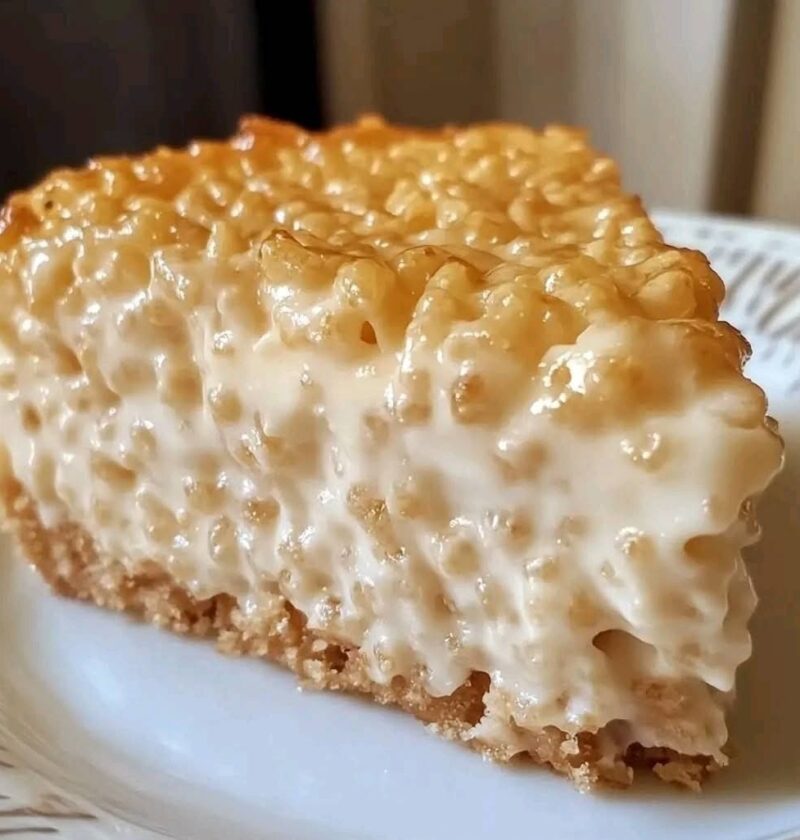
If you love the combination of creamy cheesecake, gooey marshmallows, crispy Rice Krispies, and chocolate, this easy no-bake Rice Krispie cheesecake is a dessert worth saving. It takes the familiar flavor of classic crispy rice cereal treats and turns them into a chilled, creamy cheesecake that looks impressive without requiring a complicated baking process.
This no-bake cheesecake recipe is especially appealing when you want a homemade dessert without turning on the oven. The bottom layer is made from crispy rice cereal, melted butter, and mini marshmallows. Once pressed into a springform pan and cooled, it creates a chewy-crispy cheesecake base with plenty of nostalgic marshmallow flavor.
The filling is completely different in texture. Softened cream cheese is blended with sugar and vanilla until silky smooth, then combined with freshly whipped heavy cream. The result is light, creamy, and rich without being as heavy as a traditional baked cheesecake.
The contrast between the two layers is what makes this dessert so enjoyable. You get a little crunch from the crispy cereal, chewiness from the marshmallow base, and a soft, creamy cheesecake center in every bite.
Why This Easy No-Bake Cheesecake Is So Special
There are plenty of cheesecake recipes available, but this one has a particularly fun twist. Instead of using the usual graham cracker crust, it uses a homemade Rice Krispie treat crust. That simple change gives the dessert a completely different personality.
The marshmallow-and-cereal base also makes this cheesecake a great choice for birthdays, family gatherings, potlucks, holiday dessert tables, and summer celebrations. Because the cheesecake is refrigerated rather than baked, it can be prepared ahead of time and kept chilled until you are ready to serve it.
Another advantage is that the recipe does not require eggs or a water bath. There is no need to monitor an oven temperature or worry about the cheesecake cracking during baking. The refrigerator does most of the work.
For the best texture, allow the cheesecake to chill for at least four hours. If you have enough time, refrigerating it overnight is even better. The longer chilling period allows the cheesecake filling to become firmer and makes slicing much easier.
The Crispy Marshmallow Base
The foundation of this dessert begins with 6 cups of crispy rice cereal, such as Rice Krispies. The cereal provides the characteristic light crunch that makes the crust different from a conventional cheesecake base.
Unsalted butter helps melt and bind the marshmallows while also adding richness. The mini marshmallows are gently melted until smooth before the crispy cereal is stirred in. A small pinch of salt is included to balance the sweetness and make the buttery marshmallow flavor stand out.
One important detail is to melt the marshmallows over low heat. High heat can make the mixture overly sticky or cause it to become harder once cooled. Gentle heat gives you a smoother mixture that is easier to combine with the cereal.
Once everything is coated, immediately transfer the mixture to the prepared pan. The mixture becomes more difficult to spread as it cools, so it is best to work efficiently.
A lightly greased spatula is useful here. You can also place a sheet of wax paper or parchment over the cereal mixture and gently press it down with your hands. This prevents the sticky marshmallow mixture from clinging to your fingers.
Try to press the base firmly enough that it holds together but avoid crushing the cereal completely. Keeping some of the cereal’s shape helps preserve the pleasant crispy texture.
Preparing the Smooth Cheesecake Layer
The cheesecake filling is intentionally simple. You only need cream cheese, granulated sugar, vanilla extract, heavy whipping cream, and powdered sugar.
Start with cream cheese that has reached room temperature. This is an important step because cold cream cheese can remain lumpy even after beating. Softened cream cheese blends much more easily with sugar and produces a smoother filling.
Beat the cream cheese together with granulated sugar and vanilla until the mixture is creamy and free from noticeable lumps. Vanilla gives the filling a warm dessert-like flavor and complements both the marshmallow and chocolate components.
The whipped cream is prepared separately. Use cold heavy whipping cream and powdered sugar. Whipping the cream in a cold bowl can help it reach stiff peaks efficiently.
When the whipped cream is ready, gently fold it into the cream cheese mixture. Folding rather than aggressively stirring helps preserve the air incorporated into the whipped cream. That air gives this no-bake cheesecake filling its lighter texture.
Avoid overmixing at this stage. Once the filling looks evenly blended, stop. Overworking the mixture can reduce the airy quality you want in the finished cheesecake.
How to Get a Firm No-Bake Cheesecake
Since this is a no-bake dessert, chilling is essential. Unlike a baked cheesecake, there is no oven heat to set the filling. The refrigerator needs sufficient time to firm everything.
Spread the cheesecake filling over the completely cooled crispy base. Use an offset spatula or the back of a spoon to create an even surface.
Cover the cheesecake and refrigerate it for at least four hours. For the cleanest slices and firmest texture, leave it refrigerated overnight.
Do not rush this step. If you attempt to remove the cheesecake too early, the filling may be too soft and the layers may not hold together properly.
The springform pan is particularly convenient because the removable sides allow you to release the cheesecake without turning it upside down. Before removing the sides, carefully run a thin knife around the perimeter.
Decorating Your Rice Krispie Cheesecake
The topping is optional, but it can transform this simple chilled dessert into a spectacular centerpiece.
Scatter a small amount of mini marshmallows over the surface immediately before serving. If you have a kitchen torch, lightly toast the marshmallows for a toasted-s’mores-inspired appearance and flavor.
Be careful not to hold the flame too close to the cheesecake. The goal is to lightly brown the marshmallows rather than melt the entire topping.
A chocolate drizzle adds another layer of flavor. Melted chocolate provides a bittersweet contrast to the sweet marshmallow cheesecake and gives the finished dessert a bakery-style appearance.
Finally, a sprinkling of crushed Rice Krispies adds visual contrast and a little extra crunch.
You can keep the decoration minimal or make it more dramatic depending on the occasion. For a casual family dessert, a simple chocolate drizzle is enough. For a birthday or celebration, toasted marshmallows and crispy cereal crumbs make the cheesecake look much more festive.
A Useful Trick for an Extra-Crispy Base
If you prefer a firmer, crunchier crust, there is an optional technique you can use. After pressing the Rice Krispie mixture into the pan, bake it at 300°F (150°C) for approximately 5 minutes before allowing it to cool completely.
Although the cheesecake itself remains a no-bake cheesecake, this optional step gives the cereal base additional firmness and crunch. If you want the simplest version, you can skip this step and allow the marshmallow base to cool naturally.
What If You Don’t Have a Springform Pan?
A springform pan is ideal because it makes releasing a cheesecake easy, but it is not absolutely necessary.
A 9×9-inch square pan lined with parchment paper can work as an alternative. Leave enough parchment extending over the sides so you can lift the chilled dessert out of the pan.
This option is especially convenient if you want to cut the cheesecake into small squares instead of traditional triangular slices.
For parties, cheesecake squares can actually be easier to serve. Cut them into smaller portions and arrange them on a dessert platter.
How to Slice It Cleanly
A chilled cheesecake can be sliced beautifully if you use the right technique.
First, make sure the cheesecake is thoroughly chilled. Use a sharp knife and make a clean downward cut rather than repeatedly sawing through the filling.
For professional-looking slices, wipe the knife with a clean damp cloth or paper towel after each cut. This removes cheesecake filling from the blade and keeps the next slice neat.
If the cheesecake feels slightly soft, return it to the refrigerator for additional chilling before cutting.
Make-Ahead Dessert for Busy Days
One of the biggest advantages of this easy cheesecake recipe is that it can be prepared in advance.
You can make the entire cheesecake the day before serving. In fact, overnight chilling is recommended when possible because it gives the filling additional time to firm.
Keep the cheesecake refrigerated and covered. According to the supplied recipe, it can be stored in the refrigerator for up to 3 days.
If you are preparing it for a gathering, wait until relatively close to serving time to add decorative toasted marshmallows and crispy cereal crumbs. This helps maintain their texture and appearance.
Flavor and Texture You Can Expect
The first bite starts with the crisp, chewy Rice Krispie base. The marshmallow gives it sweetness and a soft chew, while the cream cheese layer brings tanginess and richness.
Vanilla ties the flavors together, while the whipped cream keeps the cheesecake filling light. If you add chocolate, you get another flavor dimension that balances the sweetness.
This is not meant to imitate a classic New York-style baked cheesecake. Instead, it is a fun Rice Krispie cheesecake dessert that combines two nostalgic treats into one recipe.
The result is especially appealing to anyone who enjoys marshmallow desserts, cereal treats, cream cheese desserts, and easy no-bake recipes.
Serving Suggestions
For the prettiest presentation, remove the cheesecake from the springform pan only after it has completely chilled. Place it on a serving plate or cake stand.
Add your optional toppings shortly before serving. A chocolate drizzle works particularly well because it creates an attractive contrast against the pale cheesecake filling.
You can serve each slice on its own, or pair it with fresh berries if you want something slightly fruity alongside the rich cheesecake. Fresh strawberries or raspberries would provide a pleasant tart contrast, although they are not part of the original ingredient list and are therefore optional serving suggestions rather than recipe ingredients.
For children, the marshmallow-and-cereal combination makes this dessert especially fun. For adults, a more restrained chocolate drizzle and lightly toasted marshmallows can give it a sophisticated dessert-table appearance.
Helpful Success Tips
Use room-temperature cream cheese: This is one of the easiest ways to avoid lumps in your cheesecake filling.
Keep the heavy cream cold: Cold cream whips more effectively and helps create a fluffy cheesecake filling.
Melt marshmallows slowly: Low heat gives you greater control and reduces the chance of scorching.
Work quickly with the cereal mixture: The marshmallow coating becomes sticky as it cools.
Cool the crust completely: Do not spread cheesecake filling over a warm base because heat can soften the filling.
Do not skip the chilling time: Four hours is the minimum recommended chilling period for a firm dessert.
Overnight chilling is ideal: If you’re preparing this for guests, making it the day before is one of the easiest options.
Clean the knife between slices: This small step makes a major difference in presentation.
The Perfect Dessert for Parties and Celebrations
This no-bake Rice Krispie cheesecake is an excellent option when you want something that feels special without requiring complicated baking techniques.
It combines the nostalgic appeal of crispy cereal treats with the creamy texture of cheesecake. The recipe is also flexible in presentation: you can serve it as a full round cheesecake, cut it into squares, or decorate it with toasted marshmallows and chocolate for a more dramatic finish.
Whether you’re searching for an easy no-bake dessert, a Rice Krispie treat cheesecake, a marshmallow cheesecake, or a fun dessert for a family gathering, this recipe checks all the boxes.
The best part is that the preparation is straightforward. Build the crispy base, whip up the creamy filling, assemble the two layers, and let the refrigerator do the rest.
Once chilled, every slice offers a delicious contrast of textures—crisp cereal, chewy marshmallow, and smooth cheesecake. It is simple enough for an everyday dessert but attractive enough for a celebration.
Part 2: Quick Recipe Card
No-Bake Marshmallow Rice Krispie Cheesecake
Yield: 10–12 servings
Prep Time: 30 minutes
Chill Time: At least 4 hours, preferably overnight
Type: No-bake dessert
Ingredients
For the Crispy Marshmallow Crust
- 6 cups crispy rice cereal, such as Rice Krispies
- ¼ cup unsalted butter
- 1 bag (10 oz / 280 g) mini marshmallows, about 5–6 cups
- Pinch of salt
For the Creamy Cheesecake Filling
- 16 oz (450 g) cream cheese, softened to room temperature
- ½ cup granulated sugar
- 1 tsp vanilla extract
- 1 cup heavy whipping cream, cold
- ¼ cup powdered sugar
Optional Topping
- ¼ cup mini marshmallows
- 2 tbsp melted chocolate
- Extra crushed Rice Krispies for garnish
Method
- Lightly grease a 9-inch springform pan.
- Melt the butter in a large pot over low heat. Add the mini marshmallows and stir until smooth.
- Remove from the heat. Stir in the crispy rice cereal and salt until thoroughly coated.
- Firmly press the mixture into the bottom of the prepared pan. Let it cool completely.
- Beat the softened cream cheese, granulated sugar, and vanilla until smooth.
- In a separate cold bowl, whip the heavy cream with powdered sugar until stiff peaks form.
- Gently fold the whipped cream into the cream cheese mixture.
- Spread the filling over the cooled crispy base and smooth the top.
- Refrigerate for at least 4 hours or overnight.
- Before serving, add mini marshmallows, melted chocolate, and crushed Rice Krispies if desired.
- Run a knife around the pan, release the springform sides, and slice with a sharp, clean knife.
Storage: Keep refrigerated and enjoy within 3 days.