Introduction: The Secret Behind a Perfect Cloud-Like Chiffon Cake
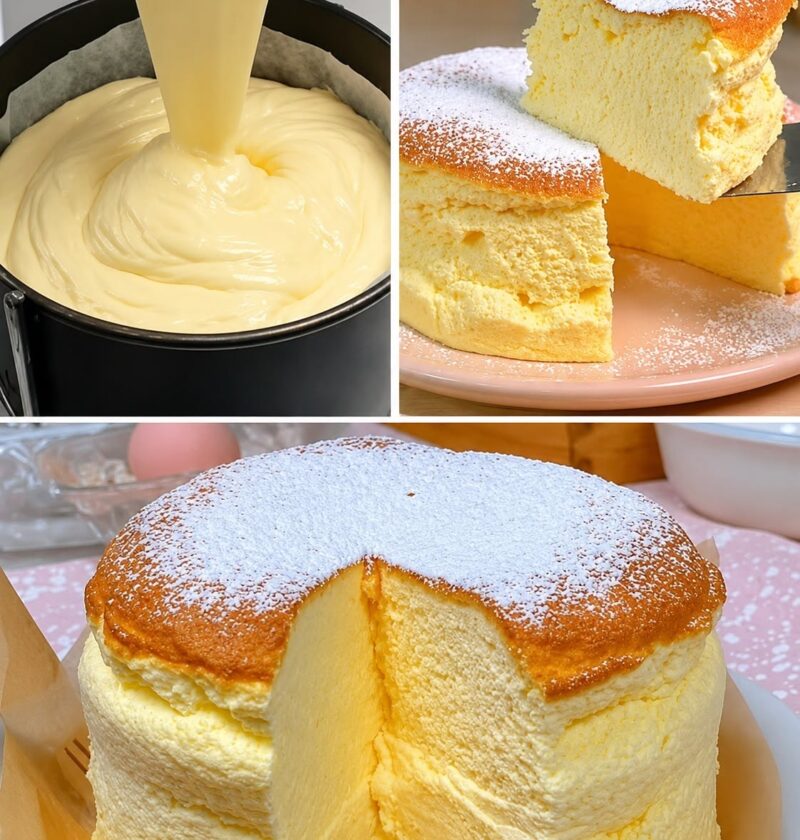
A chiffon cake is one of the most elegant and beloved desserts in the world of baking. Known for its ultra-light texture, soft crumb, and moist bite, it sits perfectly between a sponge cake and a butter cake. Unlike dense traditional cakes, this airy dessert feels almost weightless, making it a popular choice for birthdays, tea-time snacks, celebrations, and festive gatherings.
What makes chiffon cake truly special is its unique combination of ingredients and technique. Instead of relying on butter for richness, it uses vegetable oil, which keeps the cake moist for days. The structure comes from whipped egg whites, which trap air and expand during baking, creating that signature tall, fluffy rise.
If you’ve ever wondered how bakeries achieve that perfect cloud-like texture, the answer lies in precision, patience, and understanding how each ingredient works. This detailed guide will walk you through everything step-by-step so you can confidently bake a perfect homemade chiffon cake with bakery-style results, even if you are a beginner.
Why This Soft and Airy Chiffon Cake Recipe Always Works
There are many reasons why chiffon cake remains one of the most searched and loved cake recipes online:
1. Feather-Light Texture Like a Cloud
The whipped egg whites create thousands of tiny air pockets that expand in the oven. This results in a soft, delicate crumb that melts in your mouth.
2. Moist for Days Without Drying Out
Thanks to vegetable oil instead of butter, this cake stays soft and moist even after refrigeration.
3. Beginner-Friendly Baking Method
Although it looks fancy, chiffon cake follows simple steps once you understand how to fold and whip correctly.
4. Basic Pantry Ingredients
You don’t need expensive or hard-to-find items. Everything used in this recipe is commonly available in most kitchens.
5. Perfect for Every Occasion
Whether it’s a birthday party, afternoon tea, Ramadan dessert table, or weekend treat, chiffon cake fits every occasion beautifully.
6. Easy Flavor Customization
Once you master the base recipe, you can create chocolate, citrus, vanilla, or matcha versions effortlessly.
Understanding the Science Behind Chiffon Cake
Before jumping into baking, it helps to understand what makes chiffon cake different:
- Egg whites = structure + lift
- Oil = softness + moisture
- Cake flour = delicate crumb
- Sugar = stability + sweetness
- Warm water = smooth batter consistency
The most important step is whipping the egg whites correctly. When beaten with cream of tartar, they become stable and form stiff peaks that hold air. That trapped air is what gives chiffon cake its height.
Another important element is using cake flour, which has lower protein content than all-purpose flour. This ensures a tender, bakery-style crumb instead of a chewy texture.
Complete Ingredient List (Classic Chiffon Cake Base)
Dry Ingredients
- 2 cups cake flour
- 1½ cups granulated sugar
- 1 tablespoon baking powder
- ½ teaspoon salt
Wet Ingredients
- 7 large eggs, separated
- ½ cup vegetable oil
- ¾ cup warm water
- 2 teaspoons vanilla extract
- ½ teaspoon cream of tartar
Step 1: Preparing the Oven for Perfect Rise
Start by preheating your oven to 325°F (160°C). Proper preheating ensures even baking and helps the cake rise consistently from the beginning.
Take a 10-inch tube pan or chiffon cake pan. One very important rule in chiffon baking is:
👉 Do NOT grease the pan
Unlike butter cakes, chiffon batter needs to cling to the sides of the pan. This grip helps the cake climb upward as it bakes. If the pan is greased, the batter will slip and collapse instead of rising.
This step is crucial for achieving a tall and fluffy bakery-style chiffon cake.
Step 2: Mixing Dry Ingredients for a Balanced Base
In a large mixing bowl, combine:
- Cake flour
- 1 cup of granulated sugar (from total amount)
- Baking powder
- Salt
Whisk thoroughly to distribute everything evenly.
This ensures that baking powder is fully blended, which helps create a uniform rise during baking.
Proper mixing at this stage prevents uneven texture and ensures your cake rises beautifully without dense patches.
Step 3: Building the Smooth Cake Batter Foundation
Now create a well in the center of the dry mixture and add:
- Egg yolks
- Vegetable oil
- Warm water
- Vanilla extract
Whisk until the batter becomes smooth, silky, and lump-free.
At this stage, the mixture should look glossy and pour easily from a spoon. Avoid overmixing because too much stirring can develop gluten and make the cake dense.
The goal is a soft, fluid batter that will later combine with airy egg whites.
Step 4: Whipping Egg Whites to Create Volume
In a clean, dry bowl, add the egg whites.
Begin beating using an electric mixer until foamy. Then add cream of tartar to stabilize the structure.
Gradually add the remaining sugar while continuing to beat.
Continue whipping until stiff peaks form.
When you lift the whisk:
- The peaks should stand straight
- They should not collapse or droop
- The texture should look glossy and firm
This is the most important stage of chiffon cake baking.
The whipped egg whites act like a natural leavening system, trapping air that expands during baking. This creates the iconic soft sponge cake texture that chiffon cake is famous for.
Step 5: Folding Technique for Maximum Air Retention
This step requires patience.
Take one-third of the whipped egg whites and gently fold it into the batter using a spatula. Use slow, sweeping motions.
Then add the remaining egg whites in two batches.
Do not stir or beat. Folding preserves air bubbles, which are responsible for the cake’s height and softness.
The final batter should look:
- Light
- Airy
- Fluffy
- Evenly blended
If done correctly, it will feel like a mousse-like mixture.
Step 6: Preparing the Pan for Baking
Pour the batter into the ungreased tube pan.
Smooth the top gently using a spatula. Tap the pan lightly once or twice on the counter to remove large air bubbles.
Avoid excessive tapping because you want to preserve the air structure inside the batter.
Step 7: Baking to Golden Perfection
Bake for 50–60 minutes at 325°F (160°C).
Do not open the oven for at least 40 minutes. Sudden temperature drops can cause the cake to collapse.
The cake is ready when:
- The top is golden brown
- It springs back when touched
- A toothpick comes out clean
Step 8: Cooling Upside Down for Perfect Structure
Immediately after baking, invert the pan.
This prevents the cake from sinking under its own weight while cooling.
If your pan has feet, use them. If not, place the center tube over a bottle.
Let it cool completely before removing.
This step ensures a tall, airy, bakery-style finish.
Pro Baking Tips for Perfect Chiffon Cake Every Time
- Use room-temperature eggs for better volume
- Keep bowls completely grease-free
- Fold gently to avoid deflating the batter
- Measure ingredients accurately
- Never skip cooling upside down
Flavor Ideas to Customize Your Chiffon Cake
- Lemon zest + lemon juice for citrus freshness
- Orange zest for a fruity aroma
- Cocoa powder for chocolate chiffon
- Matcha powder for earthy green tea flavor
Common Baking Mistakes to Avoid
- Overmixing batter
- Opening oven too early
- Greasing the pan
- Underwhipping egg whites
- Removing cake before cooling
Part 2: Simple Step-by-Step Chiffon Cake Recipe (Quick Version)
Ingredients
Dry:
- 2 cups cake flour
- 1½ cups sugar
- 1 tbsp baking powder
- ½ tsp salt
Wet:
- 7 eggs (separated)
- ½ cup vegetable oil
- ¾ cup warm water
- 2 tsp vanilla extract
- ½ tsp cream of tartar
Instructions
- Preheat oven to 325°F (160°C). Do not grease tube pan.
- Mix dry ingredients: flour, 1 cup sugar, baking powder, salt.
- Add yolks, oil, water, vanilla → mix until smooth.
- Beat egg whites with cream of tartar until foamy, add remaining sugar, whip to stiff peaks.
- Fold egg whites gently into batter in batches.
- Pour into pan and tap lightly.
- Bake 50–60 minutes until golden and toothpick clean.
- Cool upside down completely before removing.